Main Panel
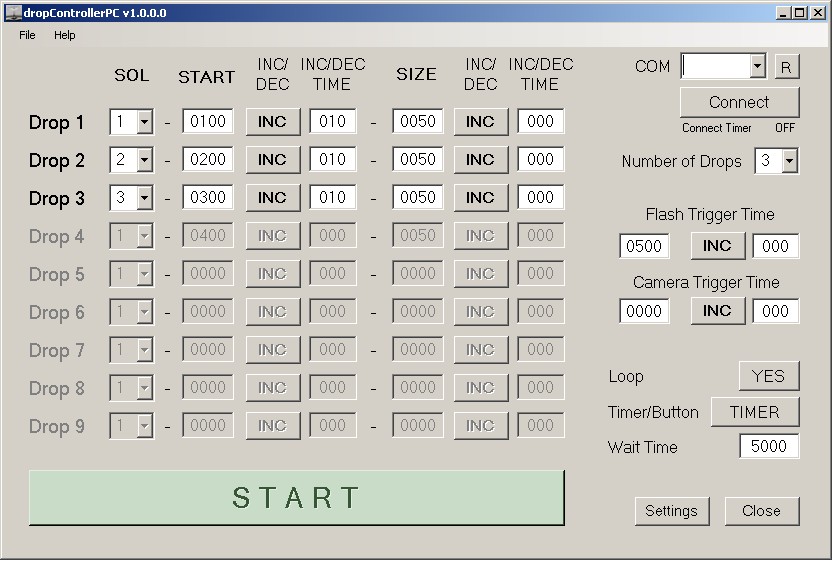
COM
- COM. A drop down list showing the available COM ports. The COM port for the dropController device is automatically assigned by the host computer when you attach the dropConttroller device to the computer. This is exactly the same as for the Arduino.
- R Button. The R button refeshes the COM port list.
- Connect Button. The Connect button (when clicked) attempts to connect to the dropController device. When the CONNECT button is clicked a message is sent to the dropController. If the dropController replies a connection is established and the button changes to CONNECTED. Clicking the Connected button allows you to disconnect.
Select the COM port for the dropController and then click Connect. Connect only works whena COM port is selected.
Number of Drops
The number of drops to use. Can be from 1 to 9. The corresponding number of drops will become active in the main drop table.
Drop Data Table
This is the main drop data table. The number of active drops can be selected using the Number Of Drops option.
- SOL. The solenoid valve to use for this drop. Can be from 1 to 6.
- START. The start time (in milliseconds). This is the time the solenoid valve opens.
- START INC/DEC. Either increase or decrease the START time when in Loop Mode. Clicking flips from INC to DEC and back again.
- INC/DEC Time. The amount of time to adjust the START time. Only works in Loop Mode, when in Single Drop Mode INC/DEC is ignored.
- SIZE. The size of the drop. This is time (in milliseconds) that the solenoid valve is open.
- SIZE INC/DEC. Either increase or decrease the SIZE time when in Loop Mode.
- INC/DEC Time. The amount of time to adjust the SIZE time. Only works in Loop Mode, when in Single Drop Mode INC/DEC is ignored.
Flash Trigger Time
The time, in milliseconds, the flash is fired.
- INC/DEC – option to increase or decrease the flash trigger time when using loop mode.
- INC/DEC time – the amount of time to add or subtract from the current Flash Trigger Time.
INC/DEC only applies to loop mode. In single drop mode it is ignored.
Camera Trigger Time
This is the time, in milliseconds, the camera shutter is triggered.
- INC/DEC – option to increase or decrease the camera trigger time.
- INC/DEC time – the amount of time to add or subtract from the current Camera Trigger Time.
INC/DEC only applies to loop mode. In single drop mode it is ignored.
Loop Mode
The LOOP button toggles Loop Mode on and off (YES/NO). When Loop Mode is on you can select how to start the drop sequences; either by a button press or by using a timer.
- TIMER/BUTTON. Select either to use a button or a timer to trigger the next sequence. When BUTTON is active the Wait Time is not available.
When using Timer, the Wait Time is the amount of time to wait before the next sequence starts. The time is in milliseconds and 1000 milliseconds = 1 second.
In Loop Mode the drop sequence is repeated indefinitely. On every loop any INC/DEC values are added to or subtracted from the drop times. The INC/DEC values are used from the second sequence onwards, The first drop sequence uses the times shown in the main Drop Data table.
Settings
The Settings button open the Settings page.
Close
The Close button closes the app.
Settings
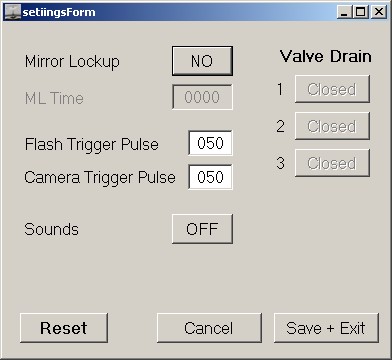
Mirror Lockup
When Mirror Lockup is selected a pre sequence shutter trigger is issued. ON/OFF option.
ML Time. This is the amount of time to wait after the mirror lockup signal has been issued. 1000ms (1 second) is a good default value. This allows time for the camera to lift the mirror and for the camera to stop vibrating.
Flash Trigger Pulse
This is the amount of time the flash trigger is active. It is not the flash trigger time.
Camera Trigger Pulse
This is the amount of time the camera trigger is active. It is not the camera trigger time.
Valve Drain
The valve drain buttons open the solenoid valves. A second press closes them. Useful for draining the valves.
Reset
The Reset button resets the settings values to their defaults.
Cancel
The cancel button closes the Settings Page without saving any changes.
Save + Exit
Saves the setting data and closes the Settings Window.
Loop Page
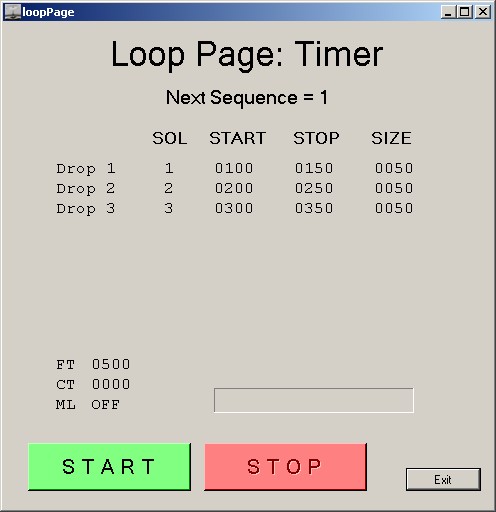
The Loop Page only opens when Loop = YES and shows the drop times for the next drop. If you have select Timer/Button = Button then you need to click the START button to activate the sequence and the app will wait for the START button every sequence. If you have selected Timer/Button = Timer then a timer will count down and the next sequence will start automatically. The first sequence is still activated by the START button though. Clicking the STOP button stops the sequence.
The EXIT button closes the Loop Page window.
The drop times will update every sequence as INC/DEC values are either added or subtracted.
For an example on how to use Loop Mode to capture a Worthing Jet see Capturing a Worthington Jet
And how to use Loop Mode to capture a 2 drop collision see 2 Drop Collision / Mushroom From a Single Valve.