Note: This is not intended as a getting started guide. It is more like a look at an intermediate level Shoot From Below system.
Shoot From Below Set available in the shop.
Shoot from below (SFB) is so called because a pressurised jet is shot up from below with the pressurised jet replacing the normal Worthington Jet. The main benefit of SFB is that the jet is consistent and repeatable and means it is easier to get collisions and far easier to get complex collisions.
As with traditional drops, aligning the valves/drops can still be time consuming and frustrating.
I started shoot from below (SFB) many years ago with a fairly simple set-up; a pressurized garden sprayer bottle, a piece of tube and a valve. I had mixed results with this until I added a pressure gauge.
Adding the gauge changed things completely. Knowing the air pressure allowed me to start getting consistent results.
Over time I added more parts, experimented with different accessories and slowly settled on the system I use now.


SFB has become more and more popular with the dropper crowd and I am getting many questions and requests about it so I put together the below describing my set up and some of the things I have tried.
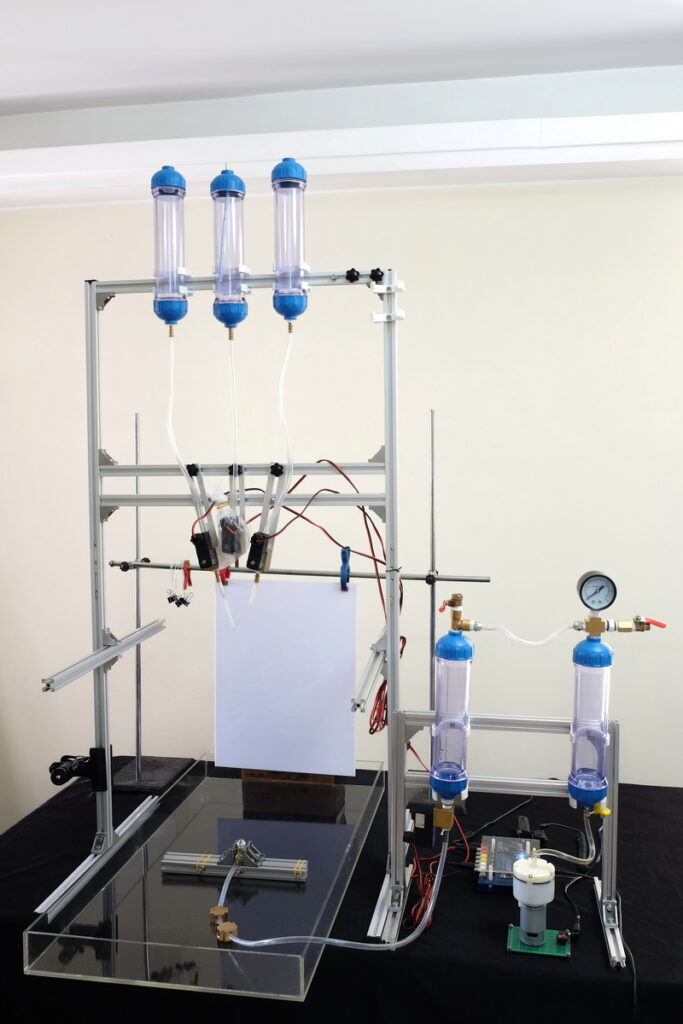
Here is one of my early full systems.
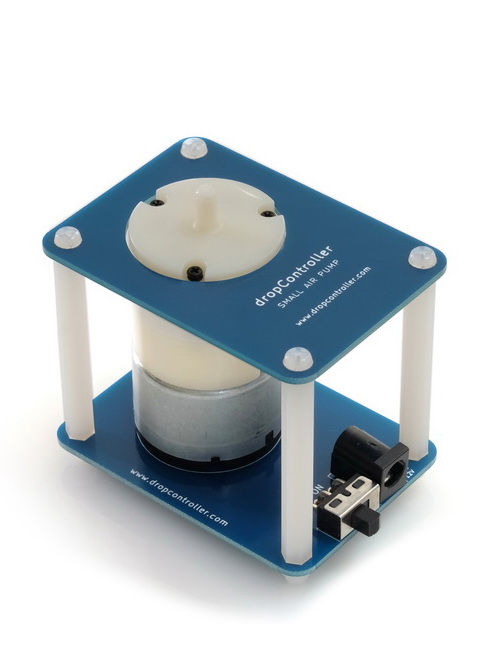
The controller is a dropControllerV3
The small frame on the right is the SFB equipment.
Note the DIY air pump and bottom nozzle base.
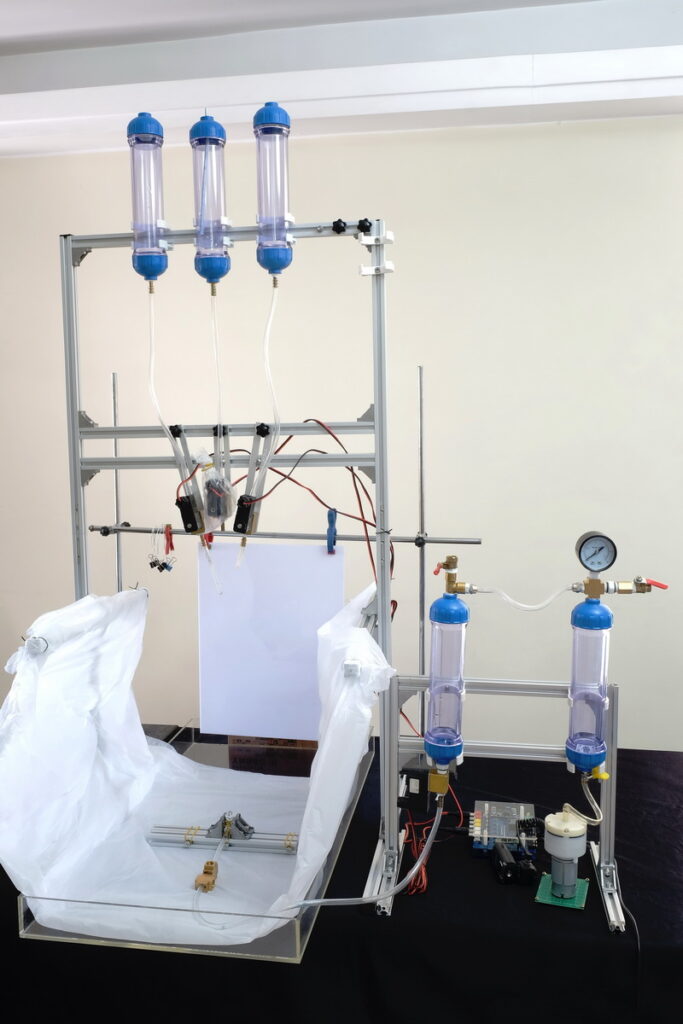
And here is the same set up with a high-tech splash guard I invented 🙂
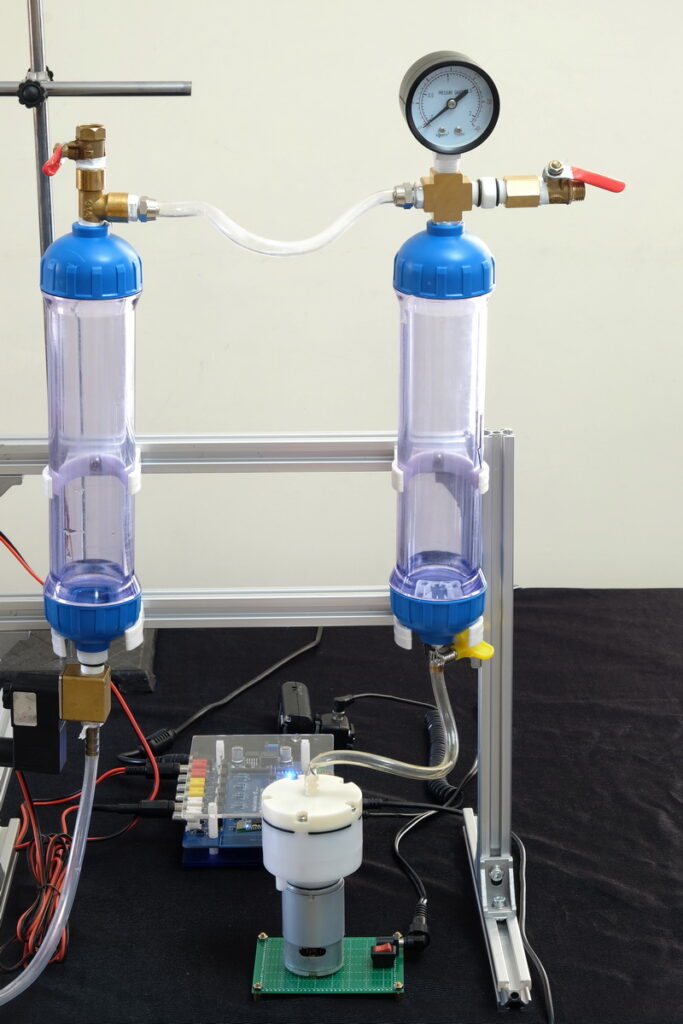
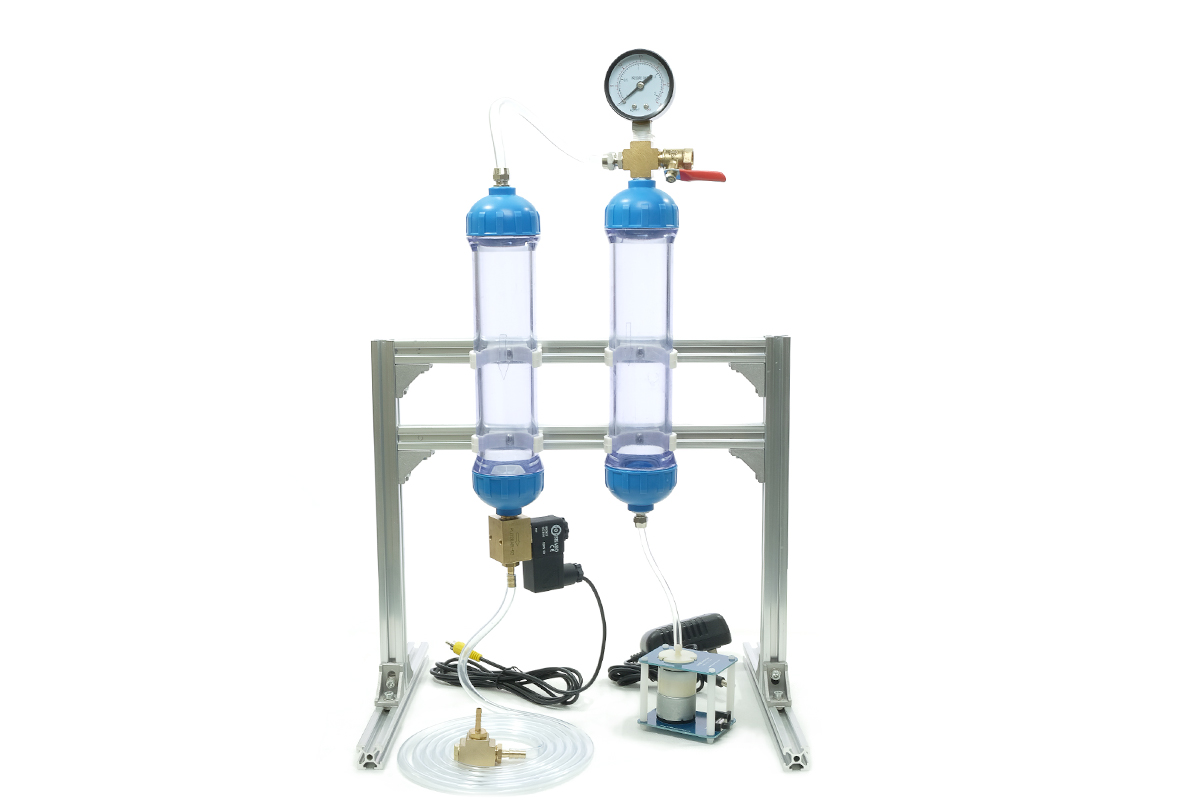
The SFB equipment comprises:
– air pump
– bottle to store pressurized air
– pressure gauge
– ball valves
– a second bottle used to hold the liquid
– a solenoid valve attached to the second bottle
– various connectors
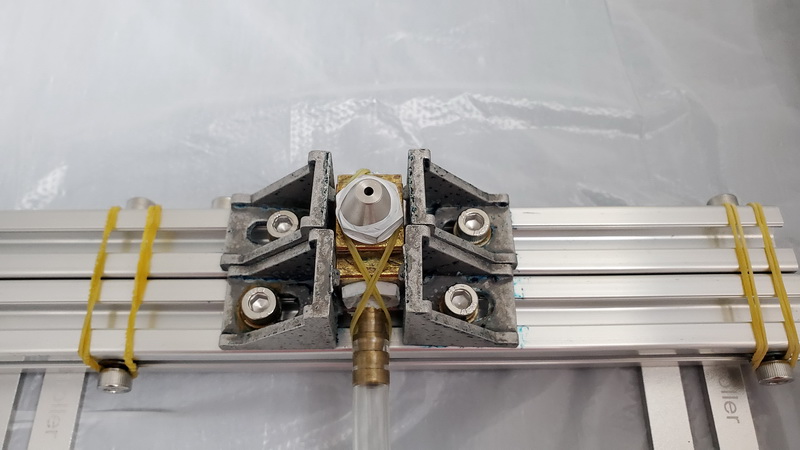
In the early days I used what was at hand to secure the bottom nozzle. Here I am using 2 short pieces (200mm) of 2020 extrusion. All held together with elastic bands. This worked quite well although sometimes it was difficult to align the jet.
The nozzle is the type used in car wash machines to clean wheel trims. The one in the photograph has a 2mm opening.
I spent a lot of time looking for something better to use to secure the bottom nozzle. I don’t like fixing the base in a permanent position and wanted something free standing that I could connect to the 3-way block.
Eventually I found mini tripod base things and made an adapter so I could attach the brass block.
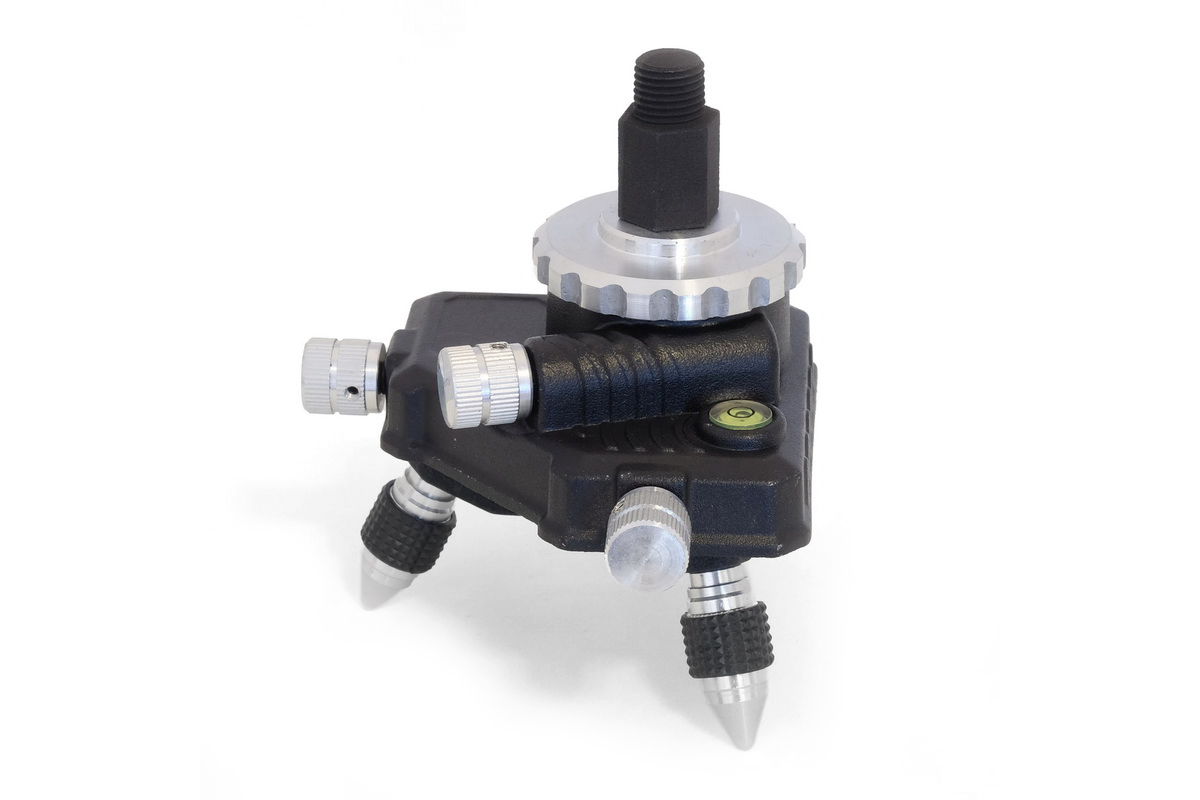
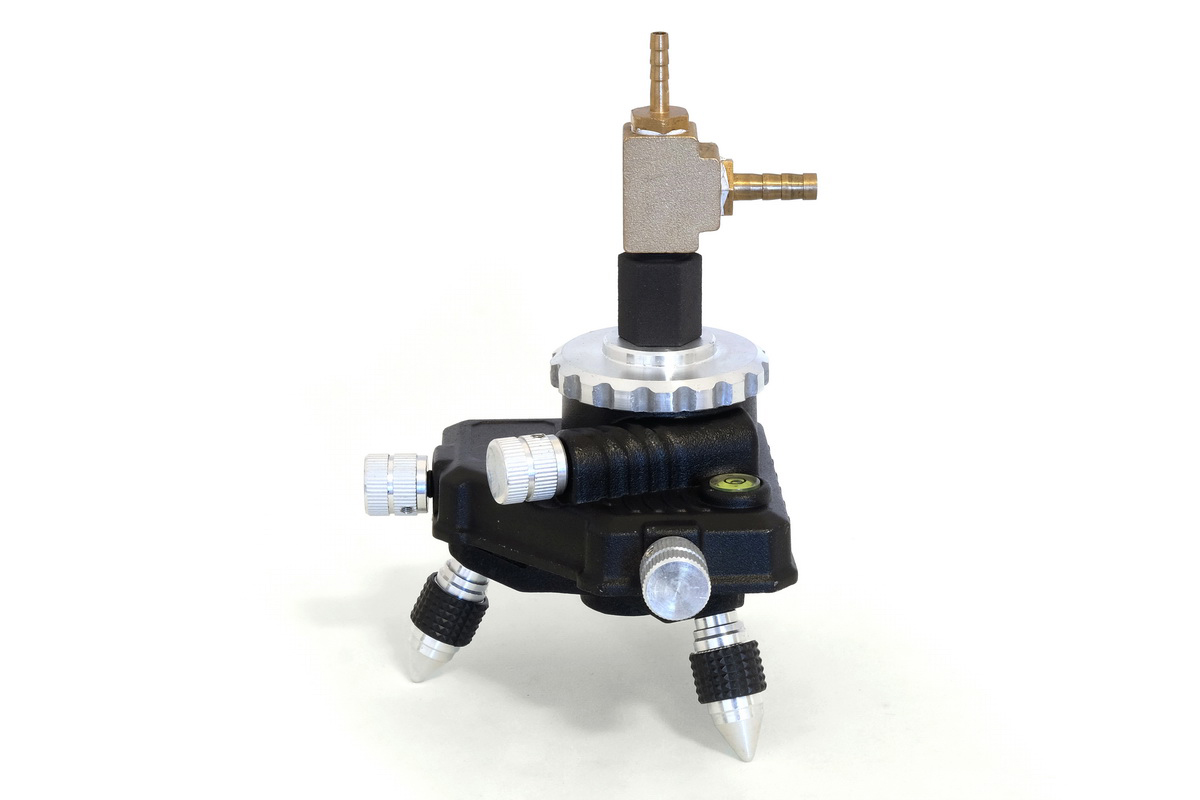
The stand with the adaptor is available from the shop.
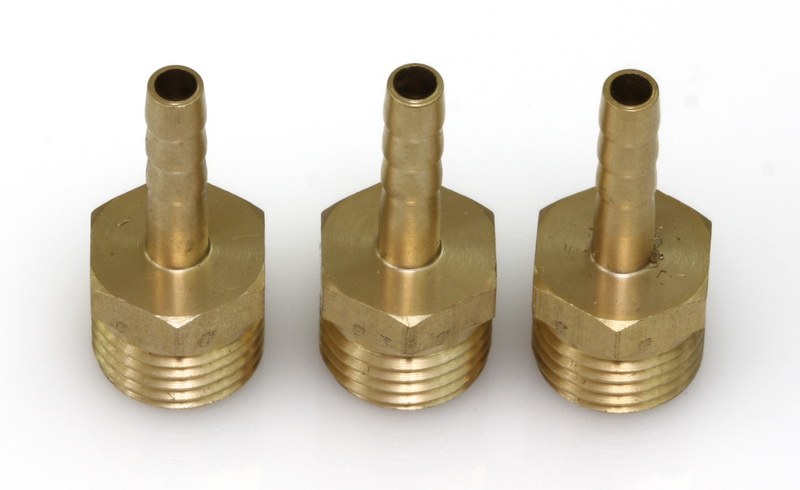
Connectors
I tried many different types of connector and while most worked quite well I settled on the quick release type.
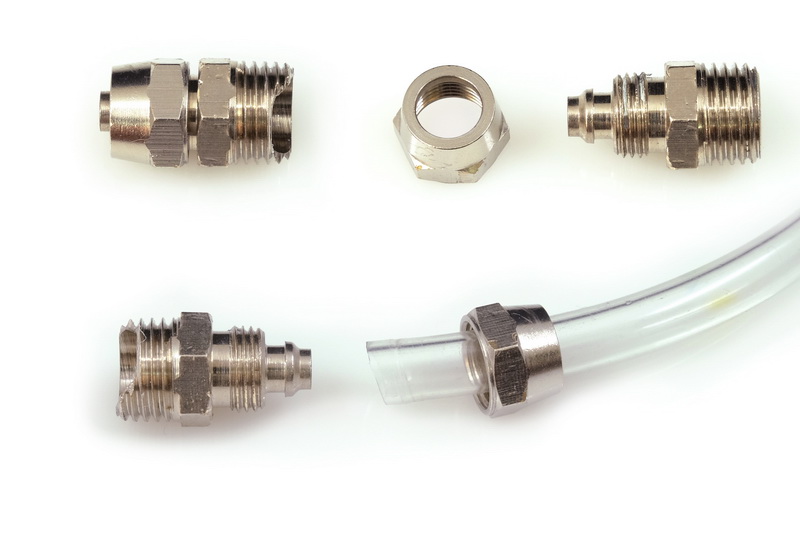
The connectors are small quick release connectors. With the nut removed the tube comes away fairly easily which makes filling and cleaning the bottles straight forward.
The nut does not need to be that tight to get a good seal.
These are the ones I prefer.

Here are slightly heavier connectors. These have a larger nut and, I believe, are designed for higher pressure.
They are exactly the same to use and are available in the same price range as the ones above.
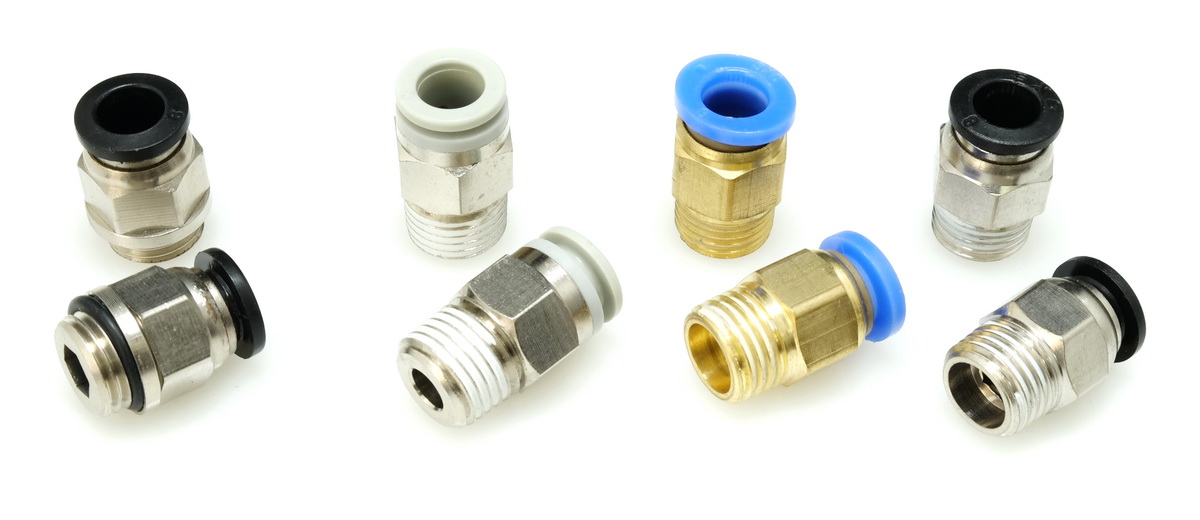
When I first started setting up a full SFB system I wasn’t sure what connectors were suitable and bought a few different types.
These are the cheapest I found but are designed for rigid tubes/pipes and not suitable for the soft PCV I use, however, if using rigid tubes these make a strong connection.
Other Fittings
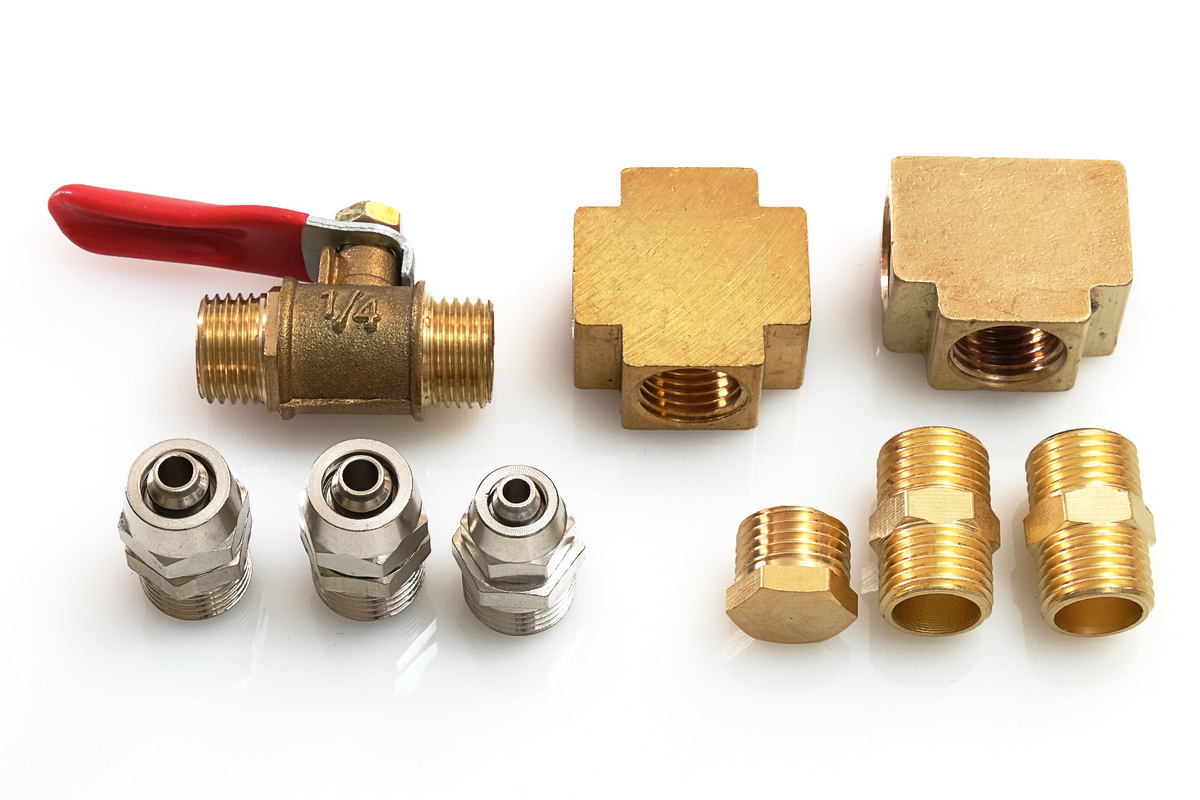
This parts in the picture are basically all you need. Add a pressure bottle or a pump and you have enough to get started.
If you want consistent results though, you really need to add at least a pressure gauge and if you get serious about repeated results you will need an air pump.
The 4-way block and 3-block are available in tube style.
Air Pumps
As with the other things, I bought a range of pumps to try (from small to large,) and from these there are 2 that I found worked well.
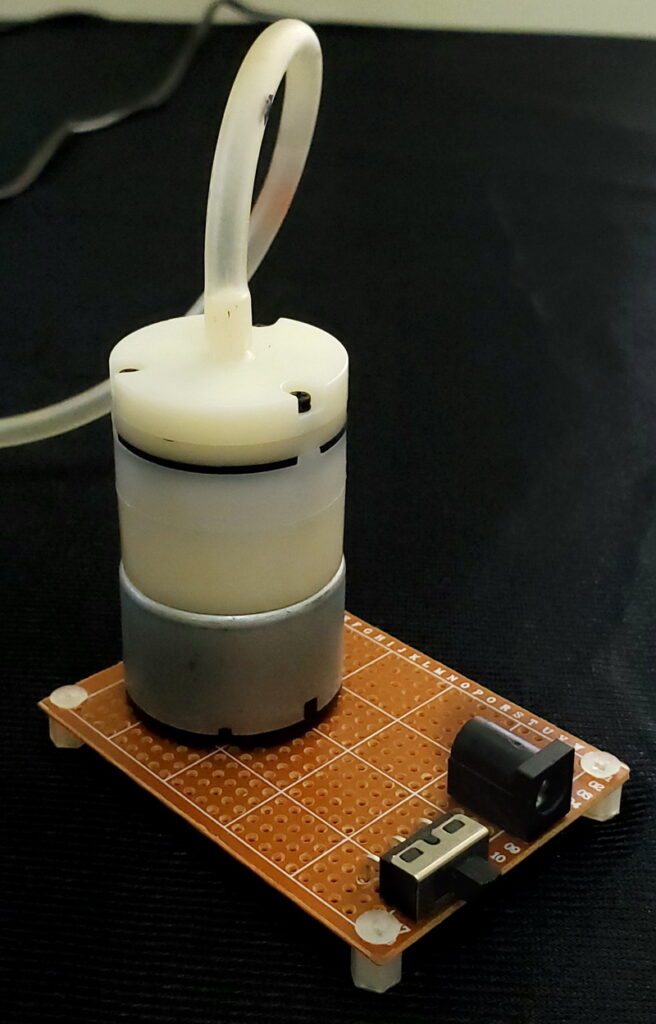
5V-12V 520 DC motor
I run this at 6v and 12v. At 6v it is very quiet but I feel, slightly under powered.
At 6v the pump produces around 3+ psi. At 12v it produces around 10psi.
The nozzle fits 4mm tube.
The pump is on a DIY base and has a very simple circuit.
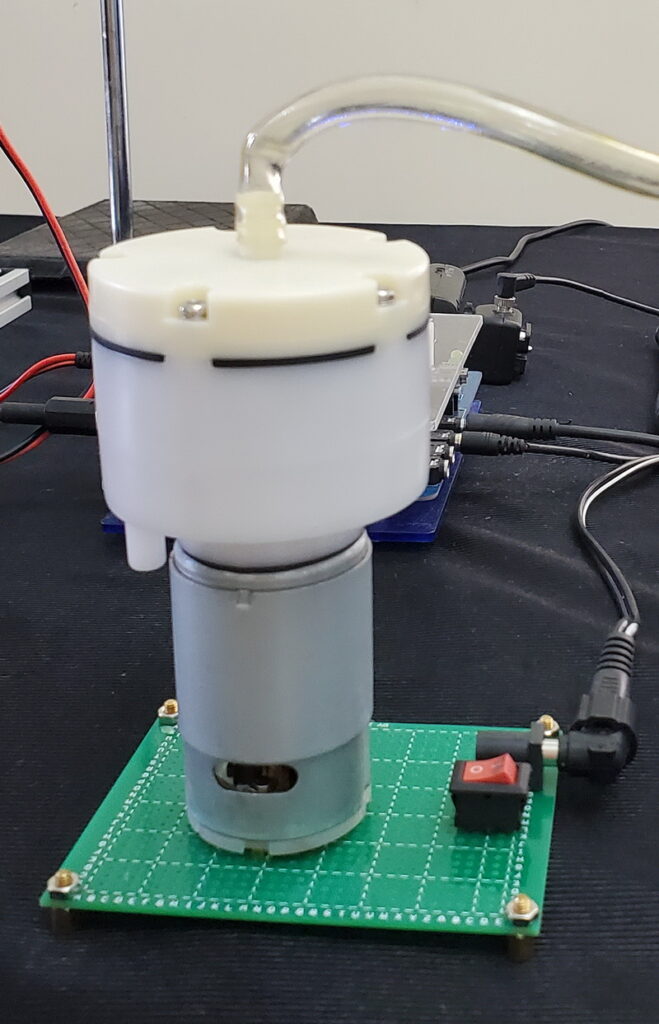
6V-12V 550 DC motor
I run this one at 12V and is it almost silent. At 12V produces around 11 psi.
The nozzle fits 6mm tube.
Another DIY stand.
The only real difference between the 520 motor and the 550 motor is the 550 is able to produce more volume. The pressure is about the same though.
I settled on the pump with a 520 motor and created a professional PCB and housing for it. I run this at 12v which generates around 10-11psi.
This is the pump that is included in the Shoot From Below Set available from the shop.
Small air compressors also work, however, check to see if it has a constant pressure function as many have cut outs (such as the ones used for air brushing).
I would not recommend aquarium pumps unless you can find a large one. Aquarium pumps tend to produce a decent flow / high volume air but very low pressure.
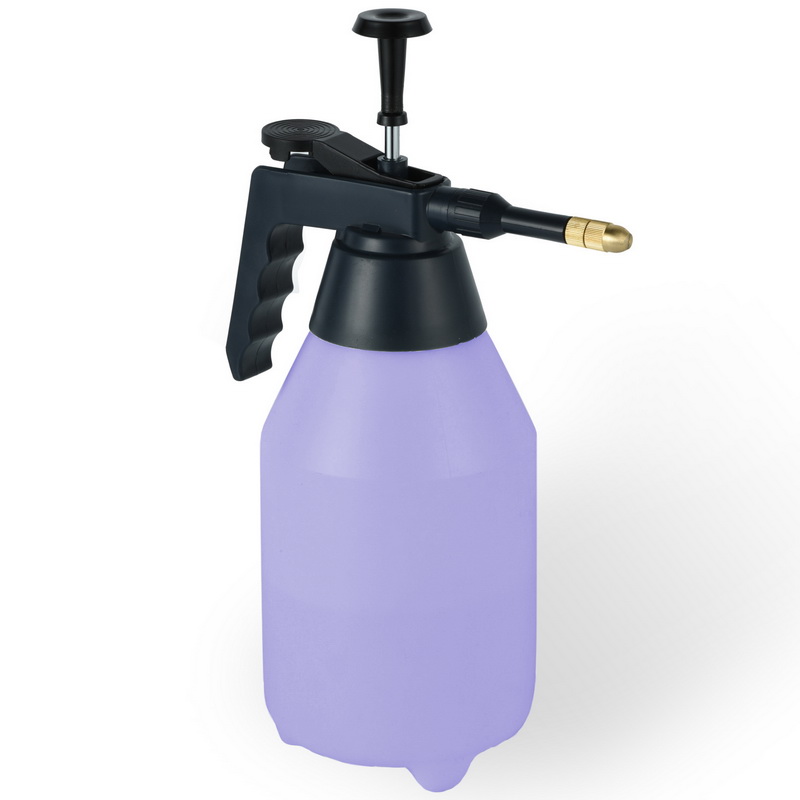
Of course, you can also use a pressure sprayer bottle, these are cheap and reliable. Finding one with a suitable nozzle will make it easier to connect.
These offer an easy way to start with SFB
Pressure
I mostly use a range between 1 psi to around 3 psi and find any of the above pumps suitable. The main difference; the larger pump has a larger capacity per minute/flow rate; 13L per minute vs 5.5L per minute. Haven’t noticed if this makes a difference. I suppose if I were rapid firing the bottom nozzle I would notice a difference.
I have settled on using the 520 pump with the manufactured PCB and have used this for a while now and not had any issues at all. The pressure is good and they are proving to be reliable.
When using the electric pump, setting the exact pressure is done using a manual ball valve, the more open it is the lower the pressure. This is not the most efficient method but works well with a constant pressure source such as an air pump. You can’t use a ball valve with a sprayer bottle though.


To regulate the air pressure the ball valve is used.
Fully open – no pressure.
Fully closed is max pressure.
Here, the ball valve is slightly open to produce about 4 psi.
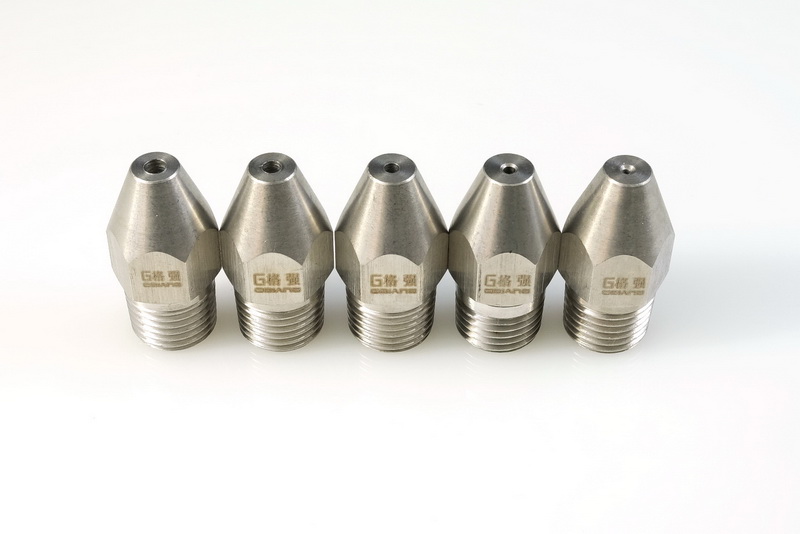
Nozzles
I have several sets of nozzles which I am slowly trying out. So far I like the 4mm brass barbed nozzle and the nozzles from car wash wheel trim jets.
4mm barbed brass nozzles
The brass 4mm brass barbed nozzles have a 2mm opening.
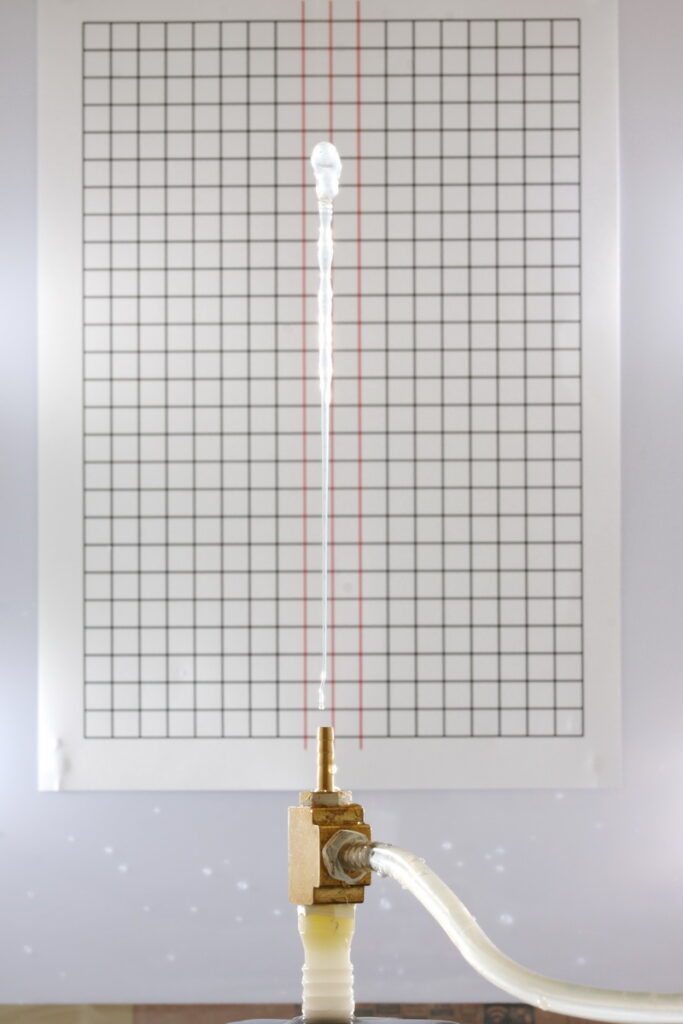
Jest from the 4mm barbed nozzle with a 2mm opening.
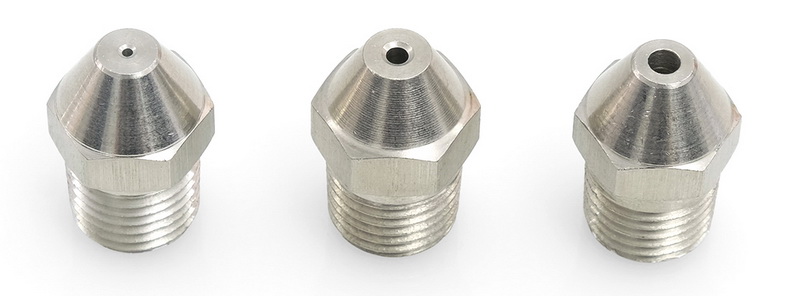
Car Wash Nozzles
As well as for other things, these nozzles are used for the jets that clean wheels in large car washers, they are available with different sized threads and with different sized holes. The below are 1/4″ NPT thread; 1.0mm, 1.5mm, 2.0mm, and 3.0mm.
The jet from the 1mm nozzle.
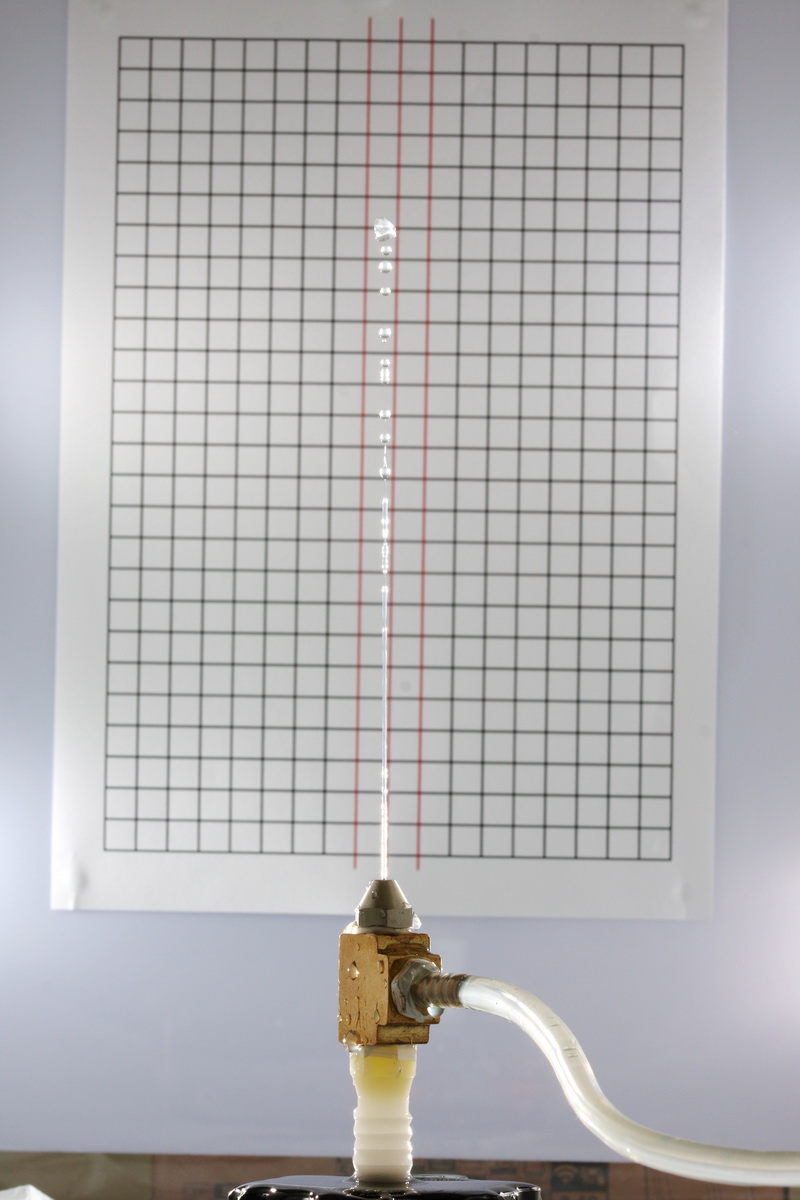
The jet from the 2mm nozzle.
At the moment I prefer this size.
And the 3mm nozzle. Thick and chunky with big splash potential.
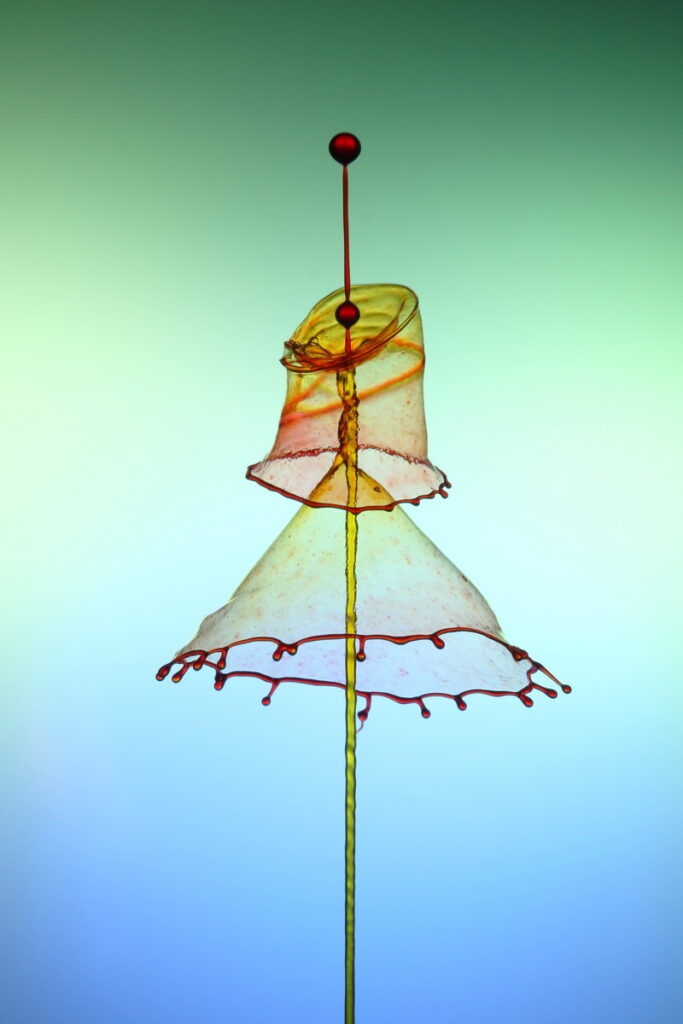
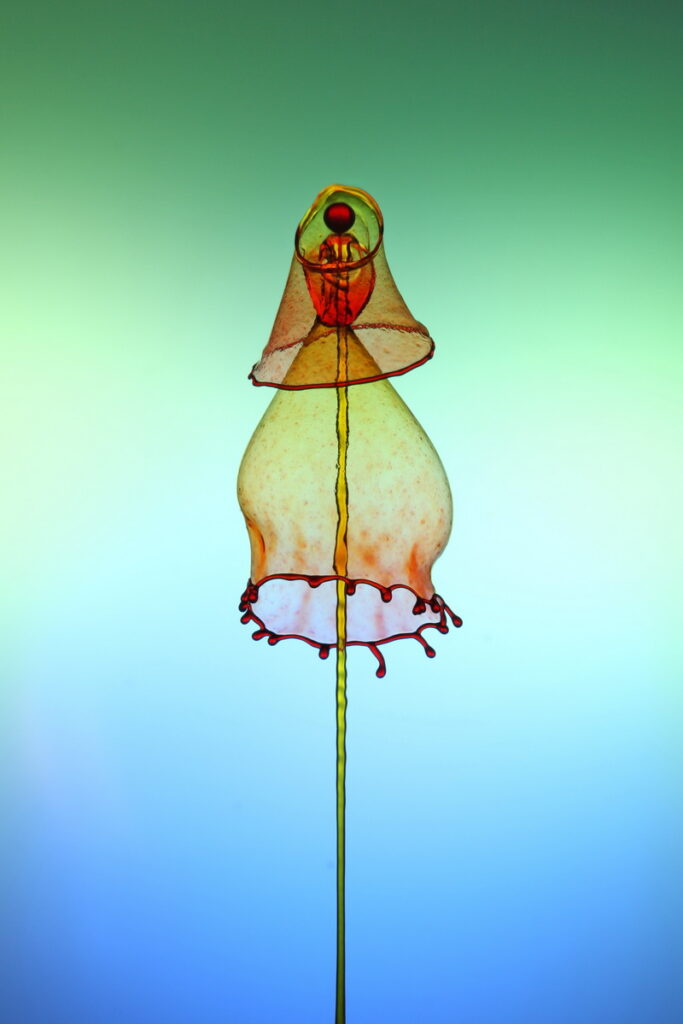
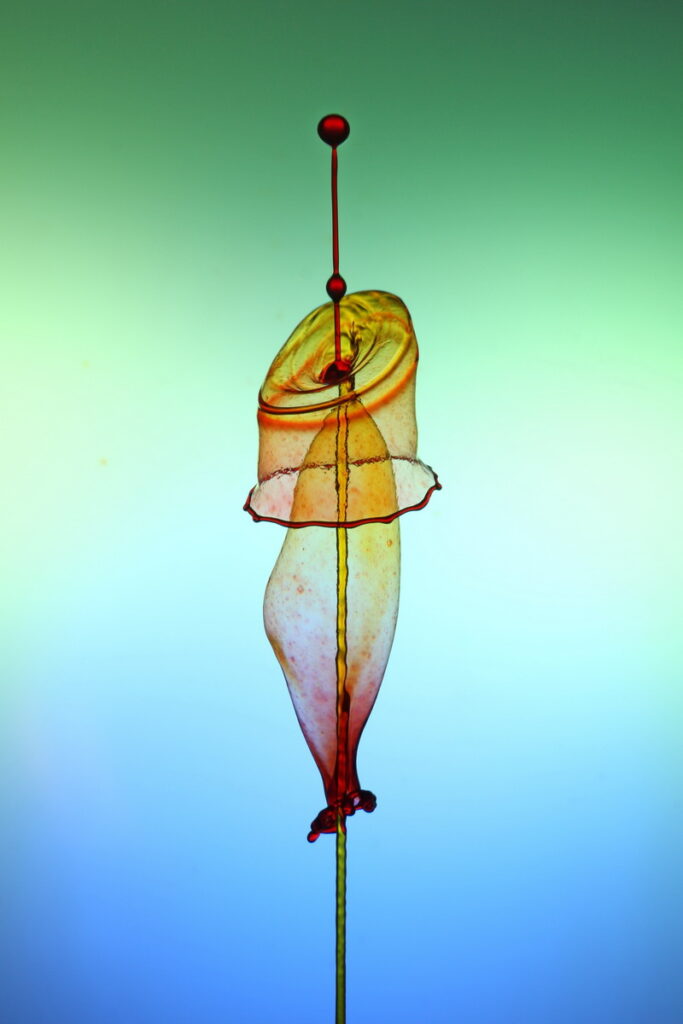
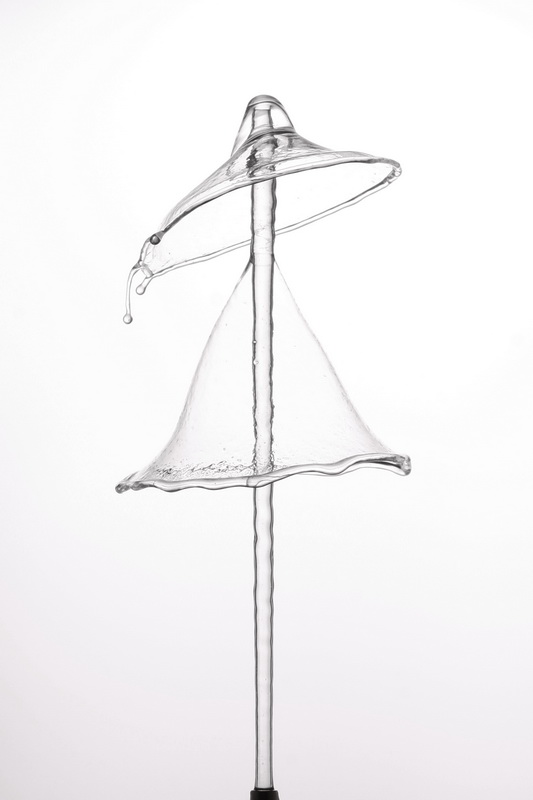
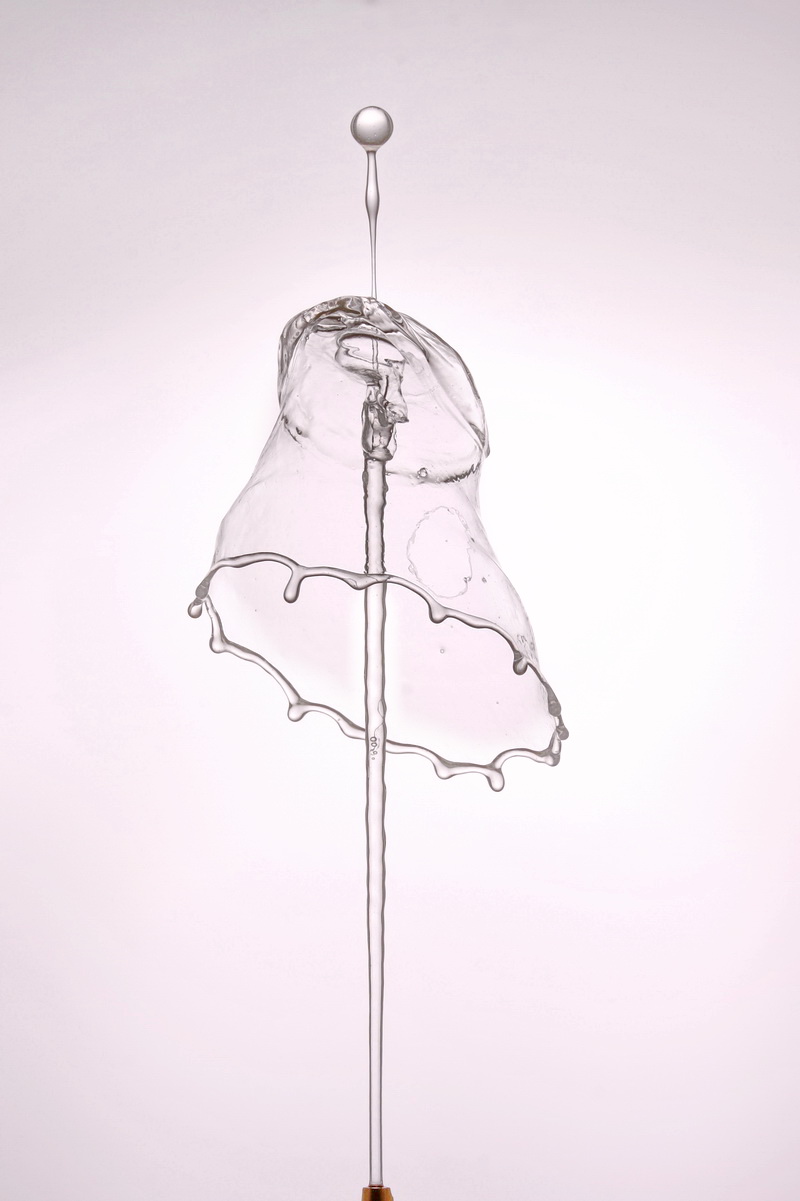
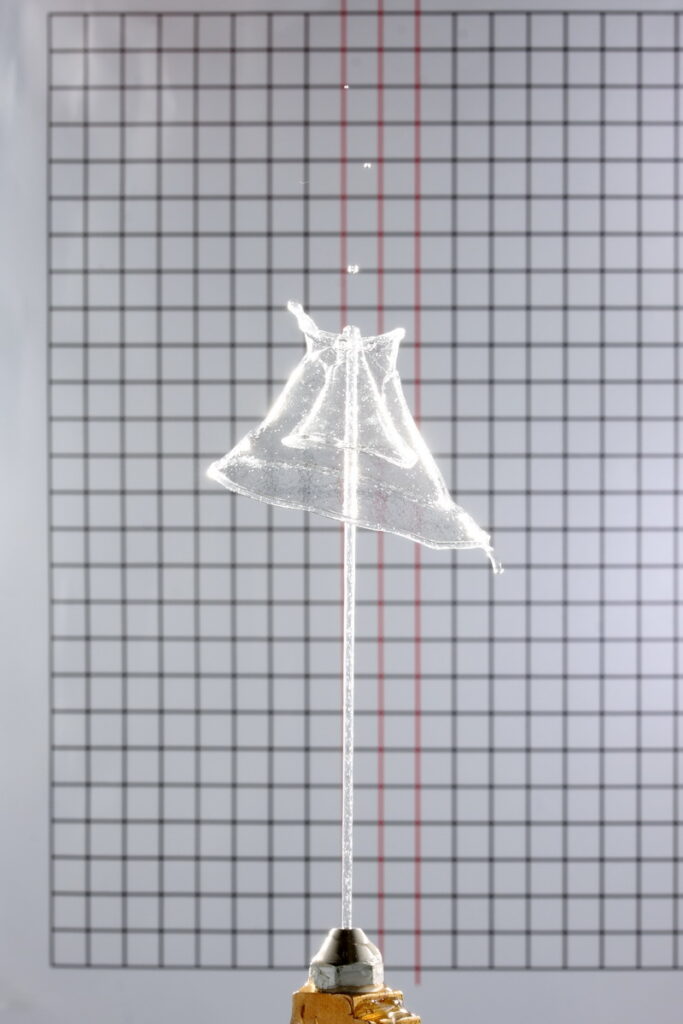
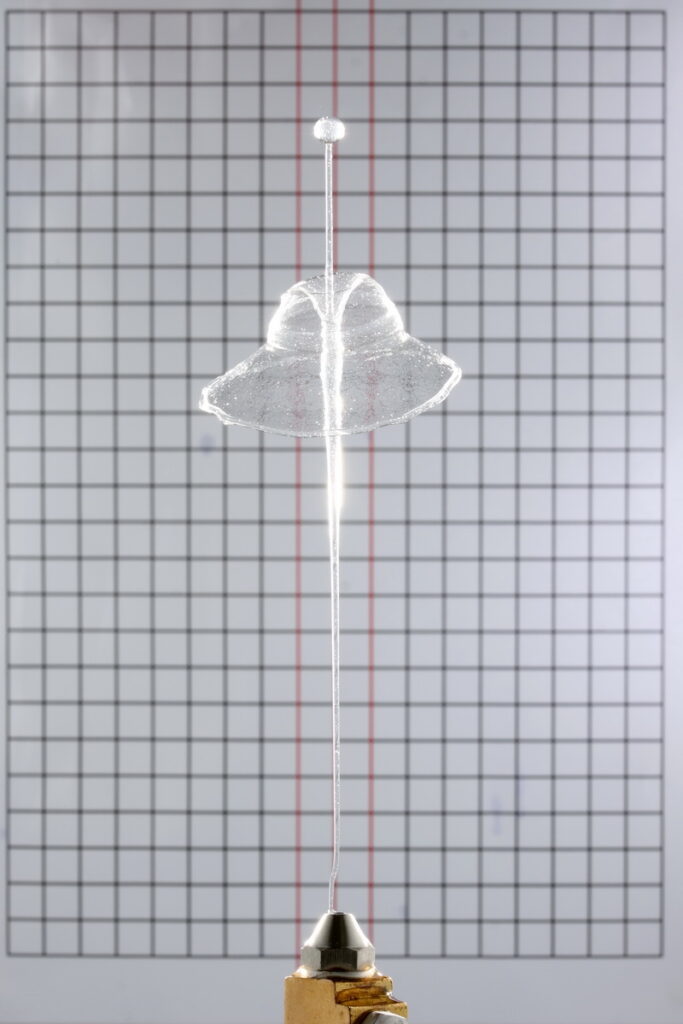
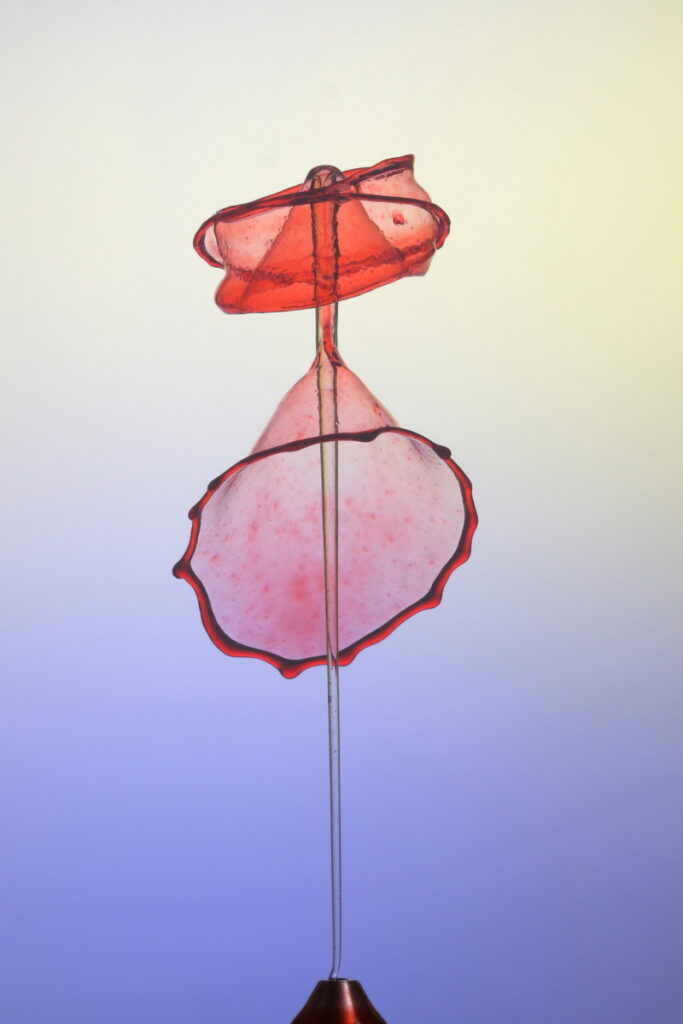
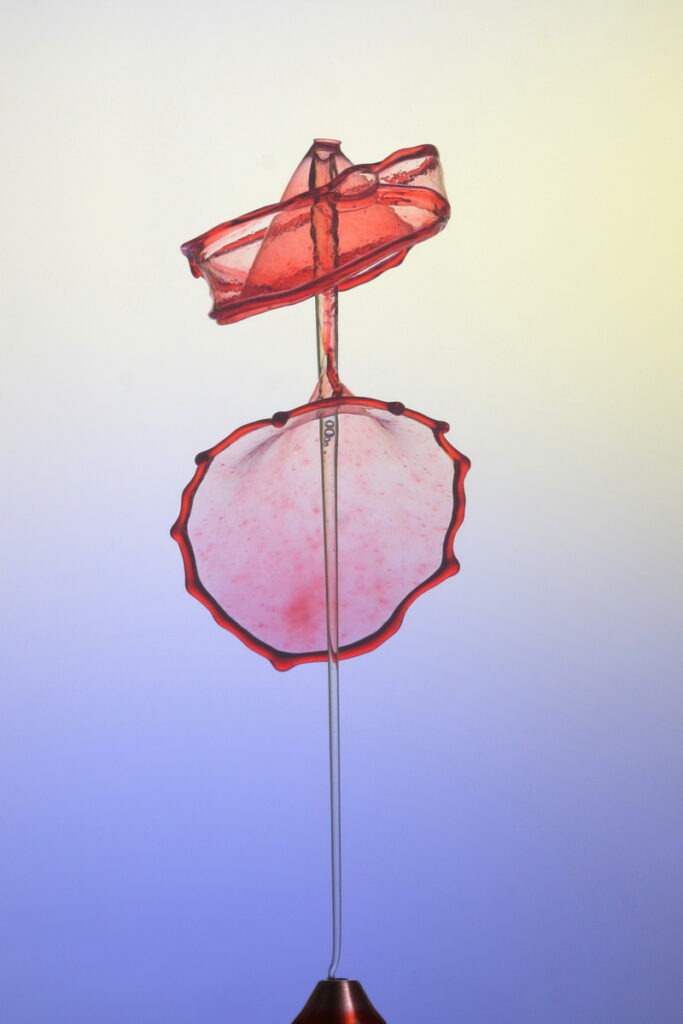
The pressure was at around 1 psi for the 1mm and slightly more for the 2mm nozzle and I had to increase the pressure to about 2.5 psi while using the 3mm nozzle. There is no rule for any of this so try different nozzle sizes and lots of different pressures. The jet pressure can have a big effect on the shape of the collisions. For umbrella style shapes you need more pressure from the top and for cup shaped collisions you need more pressure from the bottom.
The liquid used was a fairly thick mixture of water with Guar Gum. The sparkly frosted glass effect is achieved by over mixing (blending) the liquid until it goes frothy with lots of small bubbles and then back lighting.
Xantham Gum can also be used.
Here are some other nozzles I have. These are larger and much heavier than the ones above and have very similar performance.
These were more expensive, around 5 times the price. They are, however, available in more sizes. The ones in the photo are 3mm, 2.5mm, 2mm, 1.5mm, and 1mm. Other sizes are available.
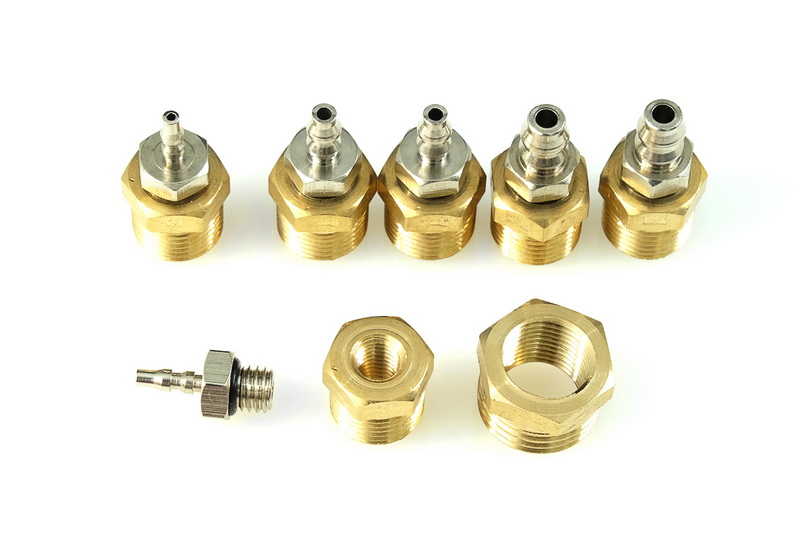
I have a whole load of different nozzles, most of which I will probably never get round to trying; such as the ones here.
These are mini M5 nozzles and probably smaller than they may appear in the photo. The nozzles appear here with M5 to 1/8″ adaptors and then 1/8″ to 1/4″ adaptors.
Final Notes
Jet Alignment
I find the hardest part of SFB is getting the jet vertical. It is easy to have the jet shoot up but for really good collisions it needs to be as straight as possible. Once you have this you can then experiment with moving the alignment. For left/right alignment I have started using a graph (see above). This was posted on one of the facebook groups. Can’t remember who posted it but when I do I will add their name. Getting the jet straight on the front/back plane is a little more difficult.
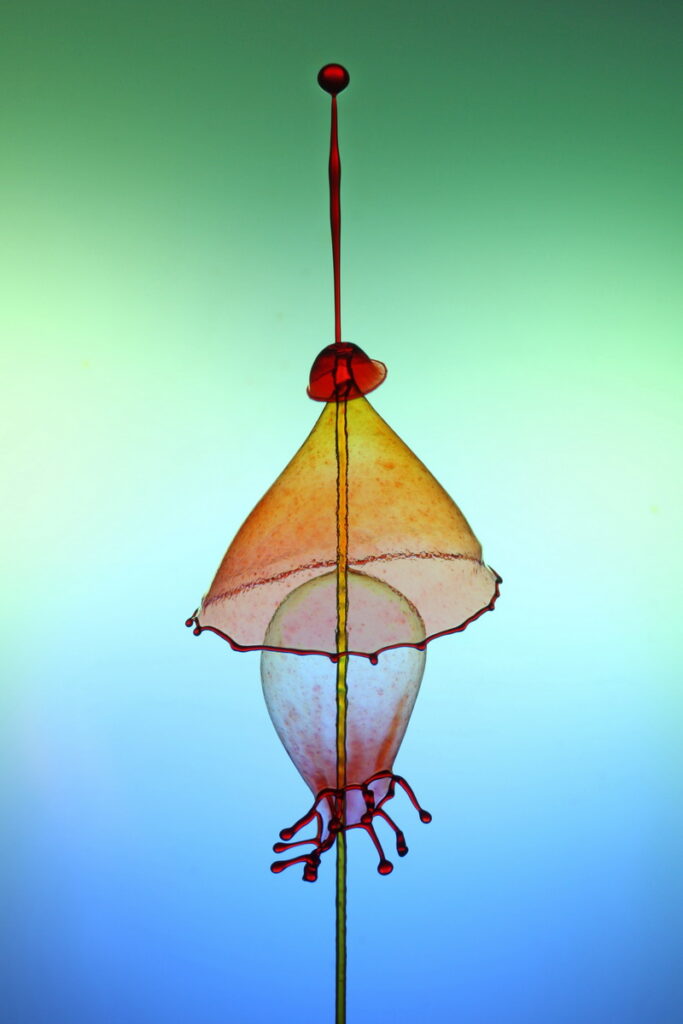
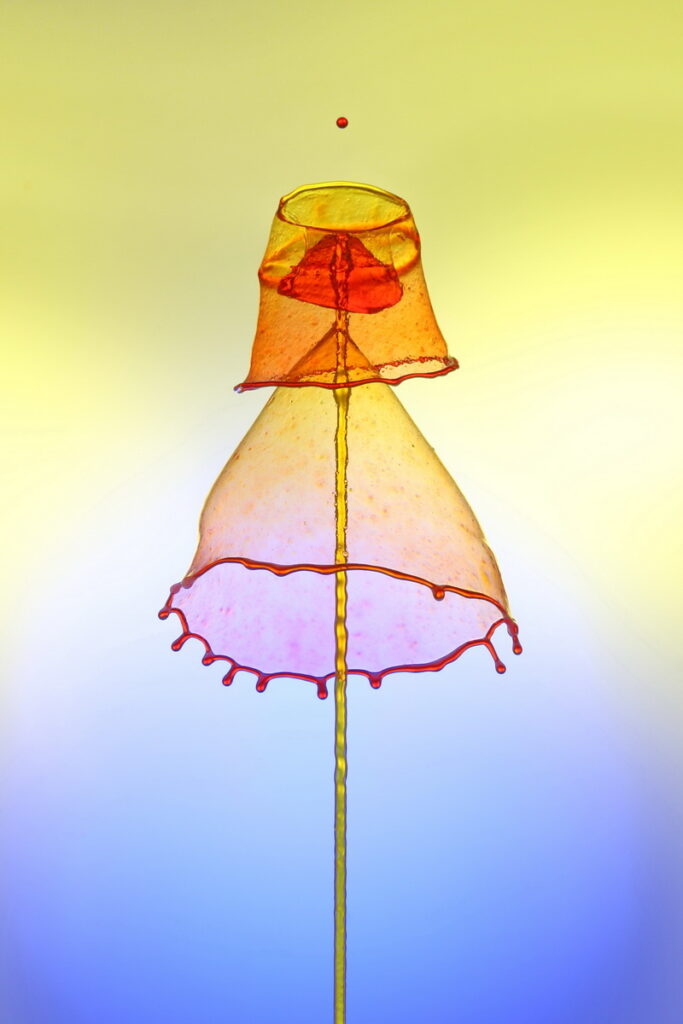
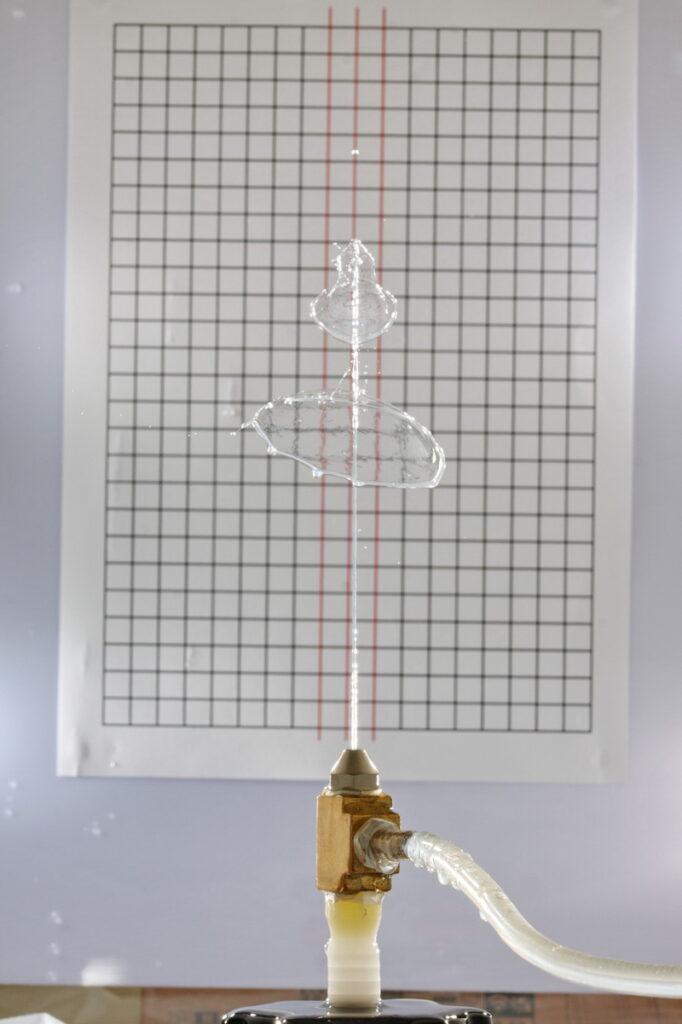
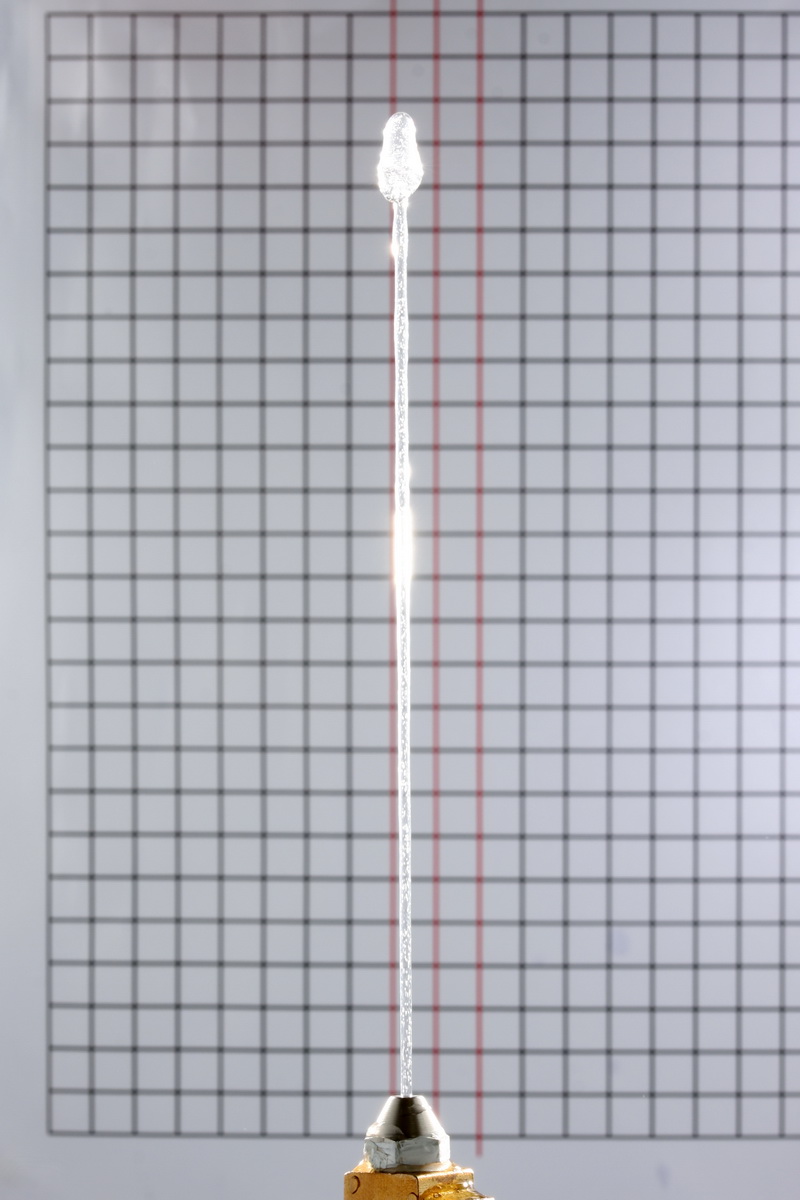
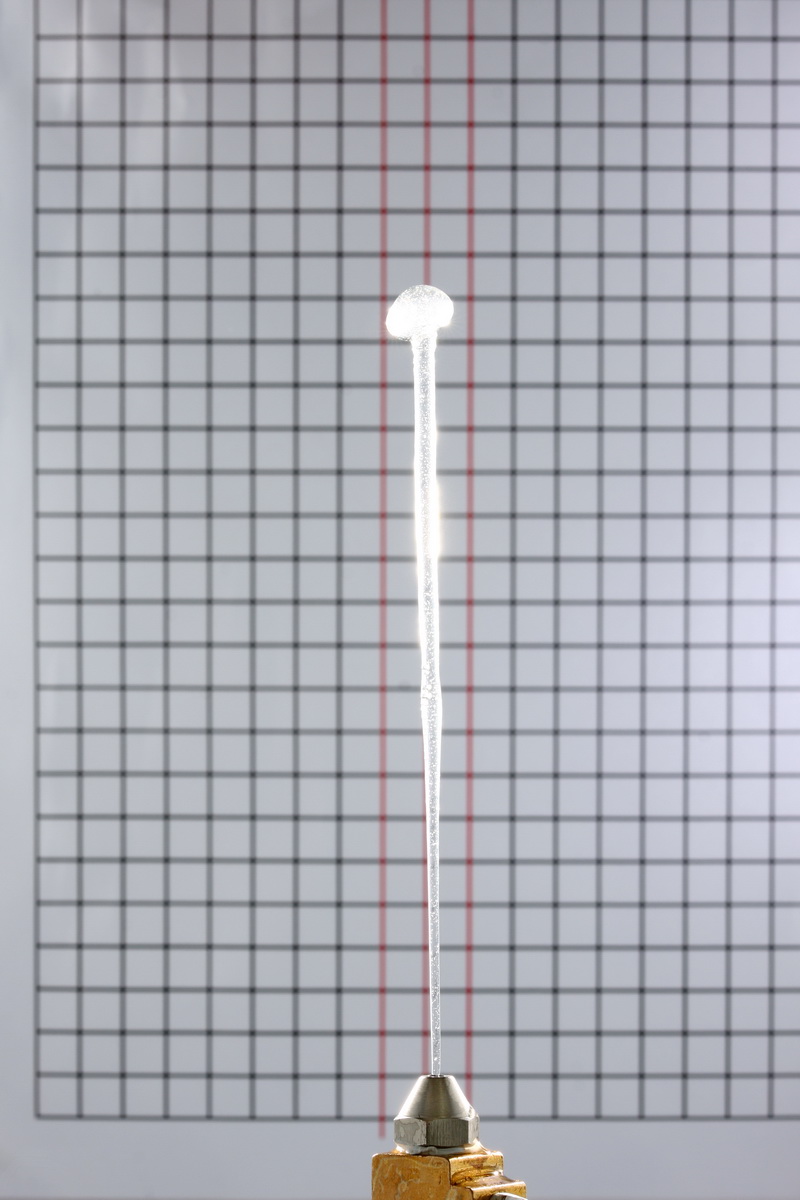
In the following images the jet is leaning forwards slightly. This means, while the top drops collide nicely, the lower drop is not aligned with the jet and the splash is being pushed backwards.
I actually like this, especially when shooting level with the collision as it means the photo captures the shape better but in this case it was a happy accident and not planned.
Bottom Nozzle
When I first started with SFB I had the bottom nozzle secured to the base and I found it very difficult to get the jet and the drops aligned. Every time I retightened the nozzle it would move a little bit and it was very frustrating to get it in to the correct position. I now have the bottom nozzle free moving and aligning it with the drop is a lot easier and quicker. A macro rail would probably make things even easier but I don’t have one.
To align the jet with the drops, I start by making a drop from the top and eyeballing where it lands. I then move the bottom nozzle to where the drop hits. I make another drop and adjust the position of the nozzle repeating the process until the drop hits the nozzle fairly central (this is the same technique I use for regular drops when gauging the Worthington Jet). I then add a jet and make very minor adjustments until I get the collision I want.
I use fairly low pressure and normally keep the bottom jet around 2 or 3 psi for nozzles with 2mm openings and maybe 1 or 2 psi for smaller bore nozzles. One of the reasons for this is the mess. I live in a small apartment and use the dining table in the main room as my work bench and have to keep the mess to a minimum. A higher pressure means bigger splashes and different shapes but also means more mess.