This guide will be rewritten.
While waiting for the new dropControllerV4 getting started guide please refer to the dC3 guide which is basically the same.
In the First Drops Guide I introduce the dropControllerV4 app, how to set the drop times and how to use a delta value to change a drop size and the flash trigger time. This guide does not describe all the controls or aspects of the app. For that, have a look through the app reference guide.
This is a 3 part guide. Part one goes though basic set up, part 2 introduces drops and how to find a good Worthington Jet, and in part 3, a second drop is added and made to collide with the jet. Hopefully the collision will generate some nice patterns and I am able to capture them.
I live in a small apartment and need to store my drop equipment when it is not in use. Every time I do water drop photography I have to get everything out and set up as new and the following is basically my work flow when starting a drop session.
Note: This guide is basically the same as the one I did for the dropControllerV3. I follow the same work flow and do the same exercises, this time though, I will try to add more details and explanations.
First Drops Part 1: Setting Up The Equipment
In this first part I go through my work flow for how I would set up the equipment using a basic set up with a single valve.
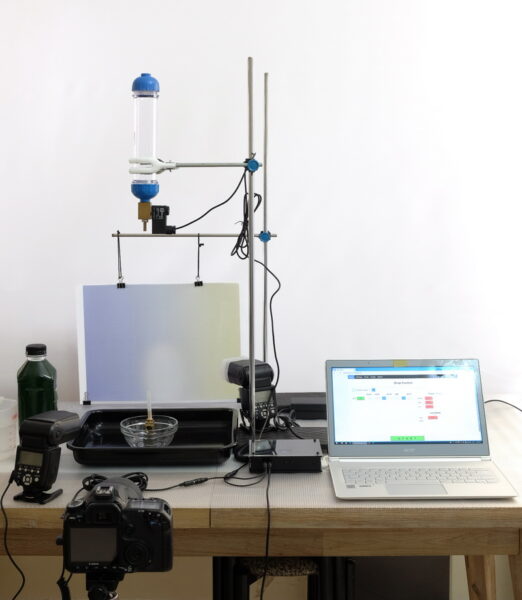
Set up
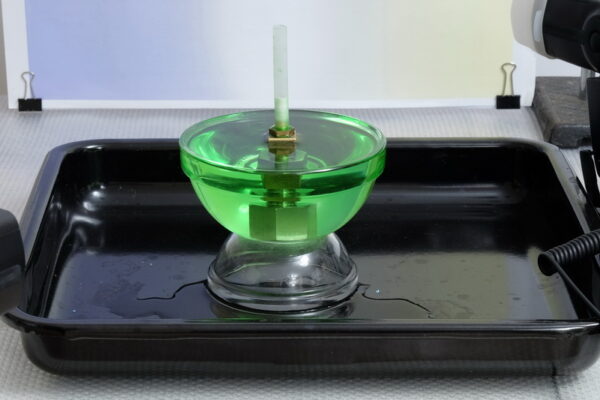
I am using a fairly simple set up
Note: Throughout this guide I am using a laptop which gives me better screen shots. The dropControllerV4 app can be used on any device that supports a web browser; phone, tablet, laptop, desktop.
- dropControllerV4
- Single valve connected to valve port 1
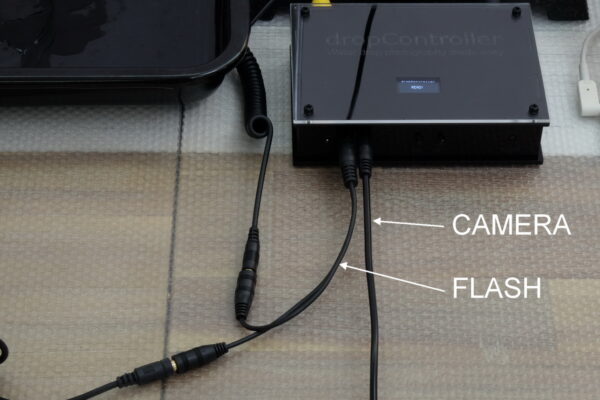
- Camera connected to the CT port
- 2 flash connected to the FT port
Camera
Canon 40D with a Sigma 105 mm macro lens. The camera is in manual mode. The lens is set for manual focus.
It is important to have the camera in manual mode. In an automatic mode, the camera will try to set the exposure and maybe the focus before taking the shot. This screws up the timings and gives unreliable results.
Flash
2 x Yongnuo YN560-III flash connected by a Y cable / headphone splitter. Y cables are a cheap and very easy way to connect flash together and the cables can be piggy backed to add more flash. The flash are in manual mode (no TTL).
The flash are triggered by the dropController rather than the camera. Both methods can be used but using the dropController allows for very precise control and means there is no concern about shutter lag and because of how I use the camera there in no issue with sync speed (more later).
There are different ways to control the flash and also to add more flash. For more information have a look at Adding More Flashes
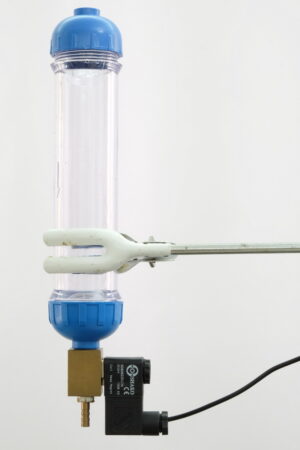
Stand
Lab/retort stand holding a valve and bottle combination. The nozzle bottom is about 40cm from the liquid surface. This is quite high and I may change it later when we get in to making drops.
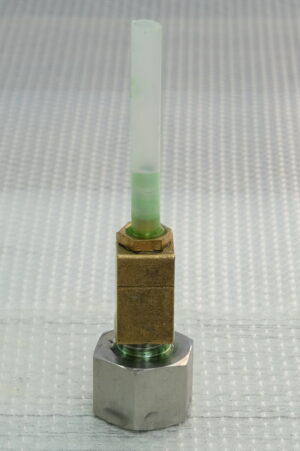
Valve
Shako Pu220AR-02 with 6mm barbed nozzle. Other nozzles can work just as well. The valve is connected to the bottle using a 1/4″ NPT 2 way connector. The join should be water tight to prevent drops.
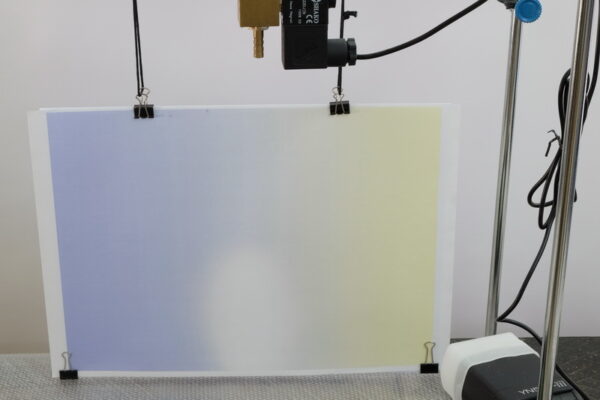
Background
Gradient pattern I printed on A3 paper. The background clipped to a piece of acrylic and supported using another lab stand.
Splash Pool / Container
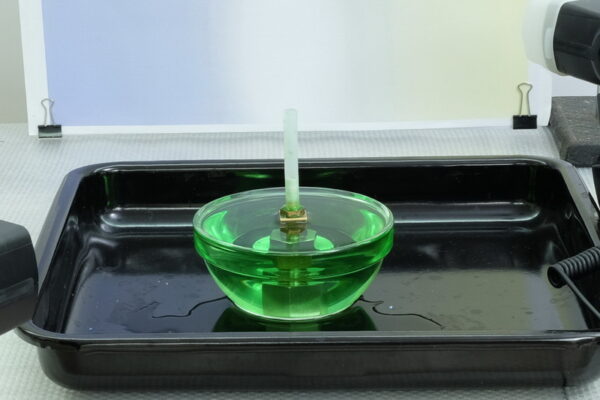
I am using a 12cm glass bowl. The bowl is standing in a shallow baking tray which is used to catch any splashes and over spill.
My Work flow for setting up the equipment
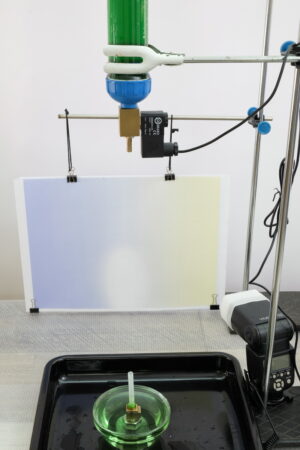
- Roughly position everything; the stand, valve & bottle, the bowl, the flash.
- Put the camera at the position & height I want.
- Make some test drops and adjust the position of the bowl so that the drops hit at the centre.
- Adjust the position of the camera and background.
Focus Aid
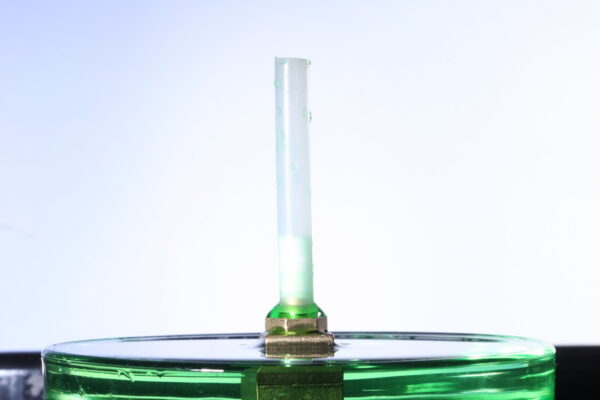
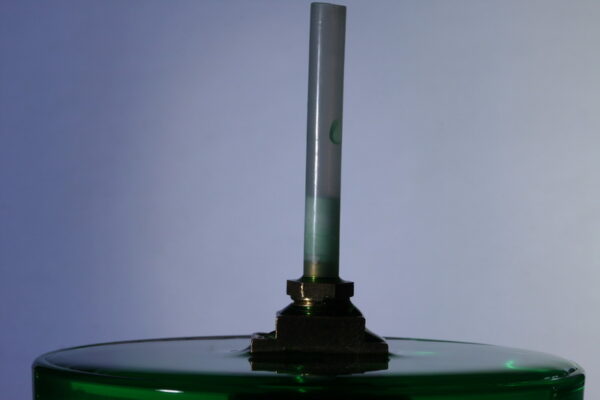
To be able to get in focus shots, we need something to focus on. I am using a brass block, a spare nozzle, and a piece of plastic tube. This is placed in the bowl at the centre.
Anything that will sit in the water (not float) and is tall enough to be above the water surface will do.
Test Drops
Add liquid to the bottle, in my case it is water + Guar Gum + green food colouring, drain a small amount off so that there is liquid in the valve and nozzle. Add water to the bowl at the bottom and place the focus aid in the centre.
For more information on liquids have a look at the additives guide.
Start up the dropControllerV4, let it connect to the local network and go to the displayed IP address. For more information on connecting the dropControllerV4 to a network see the dropControllerV4: Network Connection Set Up Guide.
Select 1 drop with a size of 30ms.
Turn off the camera and flash.
Turn off Loop Mode.
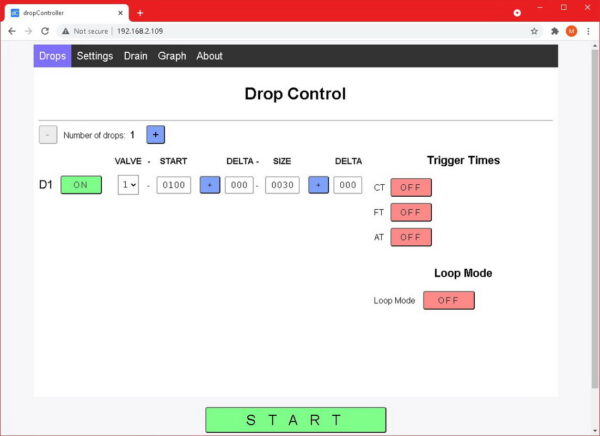
Why do I use a Start Time of 100ms on Drop 1?
When you start using multiple drops using a drop 1 Start Time greater than zero allows you to move the start time backwards without having to change the other drop settings. If the start time was at zero and I wanted it 10ms earlier I would need to add 10ms to all the other drops.
Hit the START button and watch where the drop falls. Adjust the position of the bowl so that the top of the focus aid is where the drop fell. Keep making test drops and adjusting the position of the bowl until the drop hits the top of the focus aid.
Once you know how to use Loop Mode, you can use Loop Mode with the timer to automatically make drops so you can concentrate on the bowl position.
Position the bowl so that the test drops hit the top of the focus aid.
After you are happy with the position of the bowl, finish setting up the camera and set the focus point on to the focus aid.

The camera position is totally up to you. For this guide I have the lens fairly low so that it is almost, but not exactly, level with the rim of the bowl.
Final Steps
The last step is to pick the camera settings, the flash positions, and flash power.
ISO
Using only 2 flash will mean slightly dark images so I have upped the ISO to 400. With more flash I would use ISO 100 or ISO 200. The 40D is fairly old and compared to the latest cameras has poor low light performance (it was very good at the time it was launched). If you have a newer camera with good low light ability you can up the ISO a bit. This will allow you to use lower flash settings which means sharper images.
Aperture
To find a good aperture I do a few test shots without flash and judge the ambient light. I am taking the shots using the camera not the dropController here. Remember. the flash are taking the photos so the aperture can be used to control depth of field and the ambient light.
Shutter
I am using SYNC mode in the app (explained below) and have an initial shutter speed of 1/4 second. If 1/4 second works for the test shots I will not need to change it.
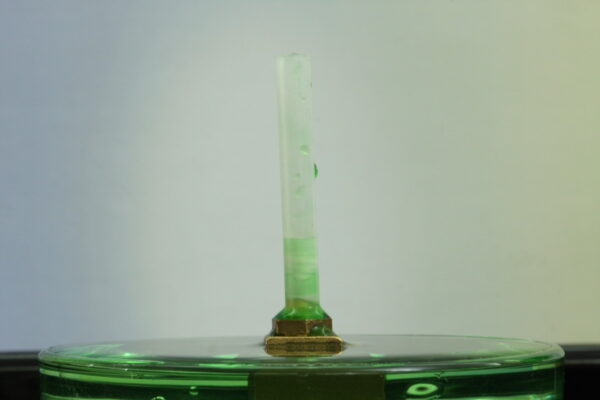
I took a couple of test shots at f11. At f11 and 1/4 second I can still make out the focus aid. (You may need to stare at the image for while to see it).
I closed the aperture down to f16 and tried again. At f16 and 1/4 second the shot is more-or-less black.

I should point out these were taken in muted daylight, in a living room with the lights off. The room was not that dark. By using the aperture you can control the ambient light in the image.
The shot at f16 was much better and darker. So my camera settings are
- Aperture f16
- Shutter 1/4 second
After a while you will probably establish camera settings that you like. f16 @ 1/4 second are the ones I general use for regular drops in a dim but not dark room. Before the dropControllers had the SYNC function I used BULB mode.
Next up are the flash.
Flash Position & Power
The final step is to position the flash and set the flash power. One thing to note with the flash, there is no right or wrong. Don’t get caught up in finding the perfect settings, they don’t exist. Set up the flash so you get good lighting and don’t be afraid to move things around and change the power as you take shots. When I have a collision I really like, I will often use the same drop settings and move the lights around and change the power settings to see how if effects the shot.
Leave the focus aid in place, turn on the flashes, and take more test shots. This time review the lighting. Note that the focus aid can be a good approximation but it is likely actual drops & jets will be different and as soon as you start taking drop photos the flash will need tweaking.
I am using a solid background and, normally, with a solid background you light the background directly, so I have a flash directed at the background (take this as a suggestion, not a rule). Power on both flash is set to 1/32. Flash zoom is set to 24mm (the widest it will go). On the flash at the back I have a diffuser attached. This should give fairly even lighting.
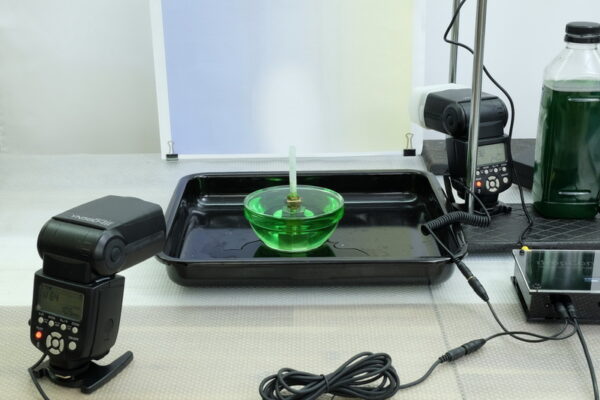
With everything plugged in and turned on I take some test shots.
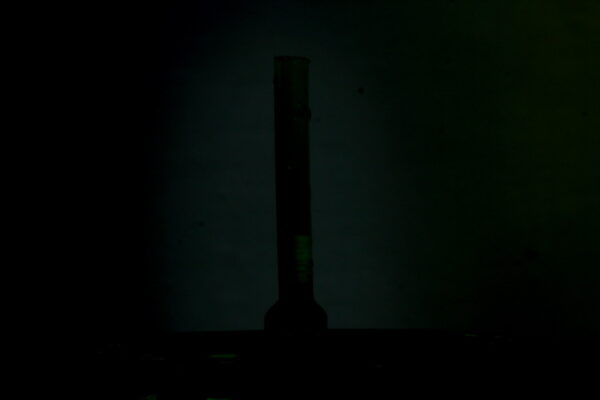
The first couple of shots were black, even though the flash fired. This means the shutter was not open when the flash triggered. I am using SYNC mode with an offset of -50ms.

A black image means the shutter was not open when the flash fired, which in turn means, the offset is not large enough. Upping the offset to 150ms solved the problem.
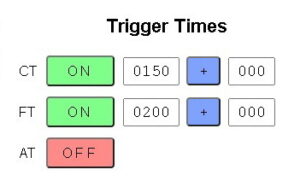
SYNC Mode & SYNC mode offset
The SYNC function syncs the shutter release trigger to the flash trigger. The shutter release time is set to the flash trigger time less the offset time. This means, if the flash trigger is set to trigger at 200ms and the SYNC offset is -50ms, the shutter will open at (200-50) 150ms. For many new cameras 50ms may be suitable, for my ageing Canon 40D it is not. So I increase the offset to 150 and try again.
Note. The shutter trigger time cannot go below zero. If the offset makes the trigger time negative, the trigger time is automatically set to 0.
For a first shot this isn’t that bad. The background may be a tad over exposed though. One thing this shot does show, is the baking tray. The top of the baking tray is quite high and would limit how I could crop the image. A quick remedy is to raise the bowl using another bowl.
and here is what the new test shot looks like.

Another thing I have noticed, the light on the background is not even. The flash is on the right hand side and the right hand side of the background, which is light yellow, is washed out. This could be difficult to resolve with just one flash and for now I will leave the position and try at a lower power.
In the above shot the flash are set to 1/32. Let’s see what 1/64 and 1/128 looks like.

Flash at 1/64
Flash at 1/128
The last one at 1/128 is slightly dark but I am going to go with it. Remember, at lower powers the flash duration is shorter and will freeze motion better, therefore, I am going to start with 128 and see what the drops look like. If I don’t like how the drops look I can up the power later.
Although the light on the background is not even it isn’t that bad. I kind of like the left hand side being darker. Not sure what green drops against the blue background will look like though. I guess we will find out in part 2.
Note:
There is no right or wrong way to do this. If you do this exercise yourself, experiment with the light. Change the flash positions and powers.
In the next part I start photographing drops.