The dropController have been upgraded and dropControllerBT is no loonger support. See the latest version here.
dropControllerBT is a Bluetooth version of the dropController and all control is by an Android app. Using an Android device makes things a lot more convenient and also means there is less hardware required, no need for an LCD or keypad. You do need an Android device though.
There are 2 slightly different versions of the dropControllerBT. A breadboard version and a perf board version. The breadboard version has LEDs that show when the flash, camera and solenoids are active. Since the perf board version is designed to be put inside a project box it does not have the activity LEDs. Both work in the same way and use the same Arduino sketch.
dropControllerBT is my preferred version and the only one I use now. It is a lot easier to use than the basic version and I would recommend building the Bluetooth version.
dropControllerBT is now compatible with the Windows control app and can be used with a Windows PC via a usb connection or a Bluetooth connection. Requires firmware 009b or above. When upgrading the firmware you will also need to update the Android app to version 1.37 or above.
Breadboard version of a 3 valve dropControllerBT
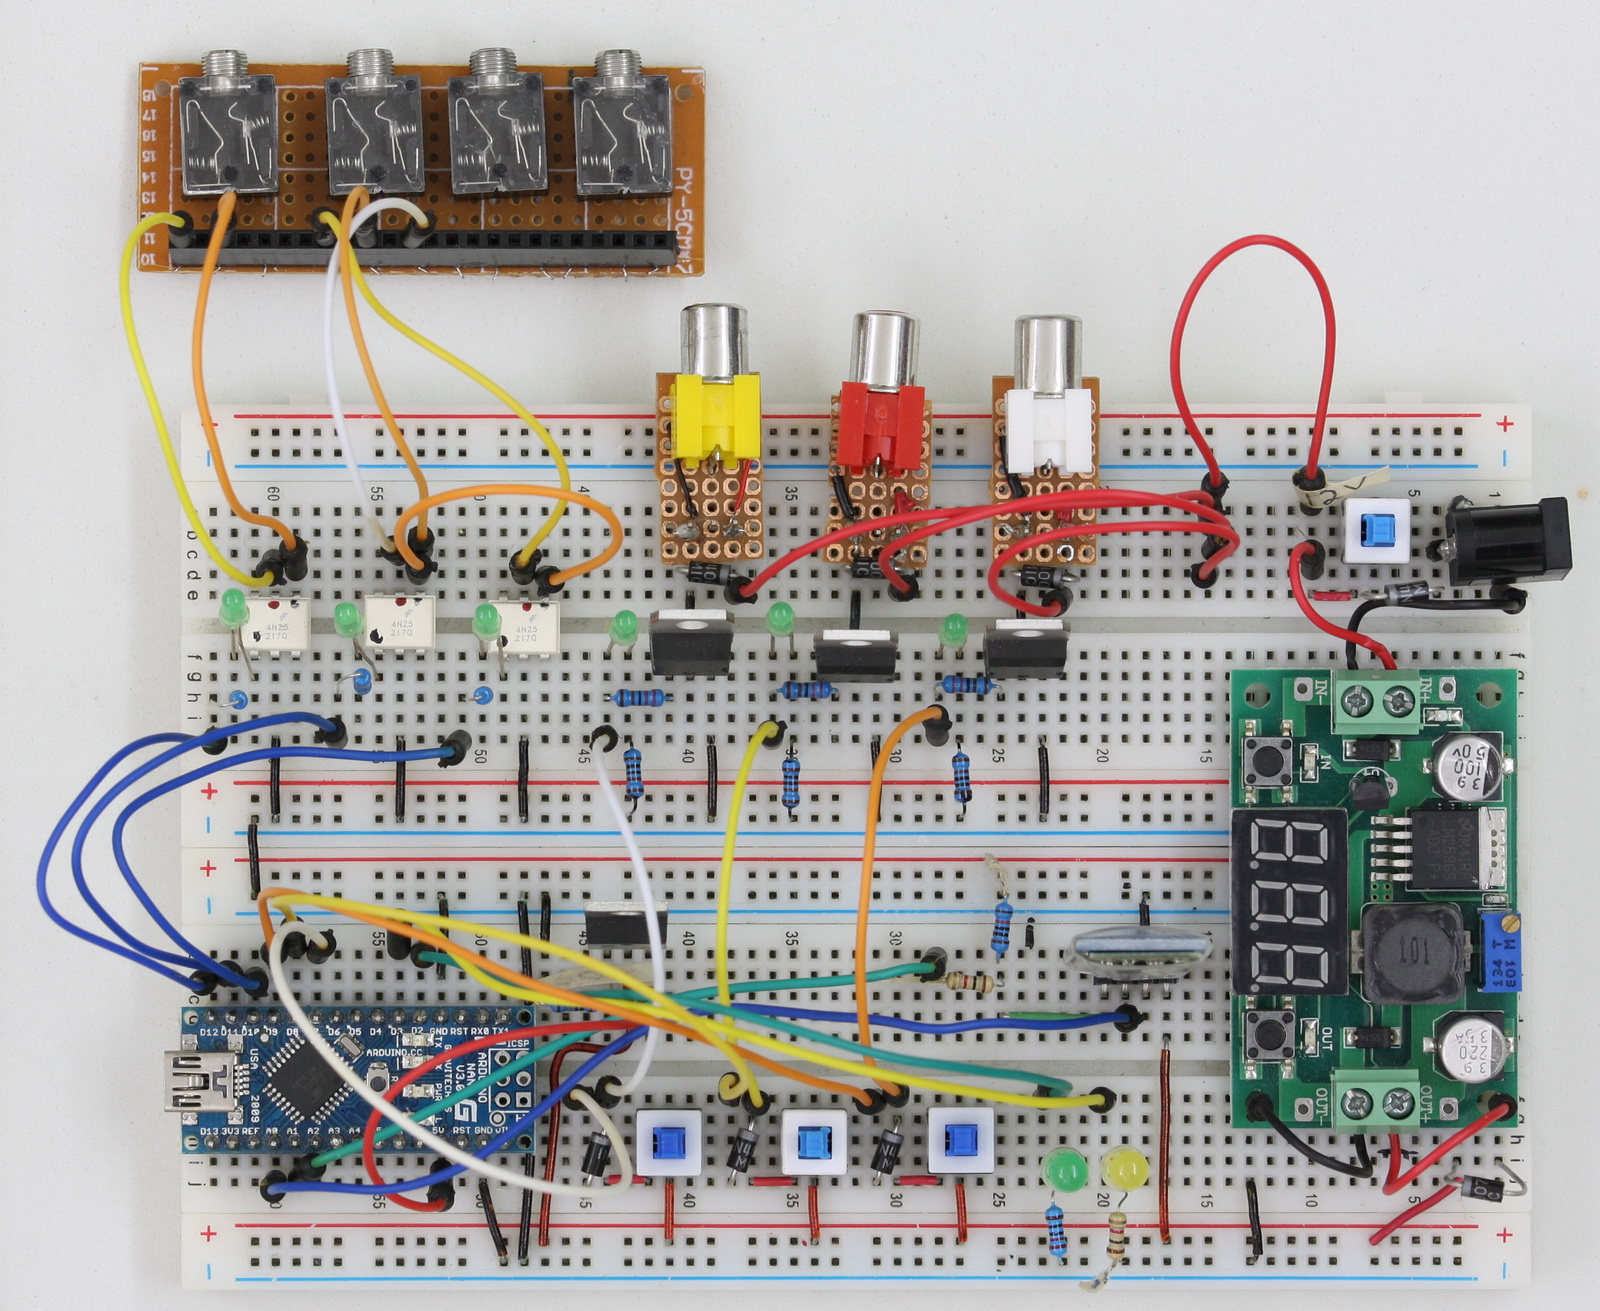
The bread board version has LEDs, to show when the camera and the solenoids are active, and switches for draining the valves.
Perf Board Version of a 3 valve dropControllerBT
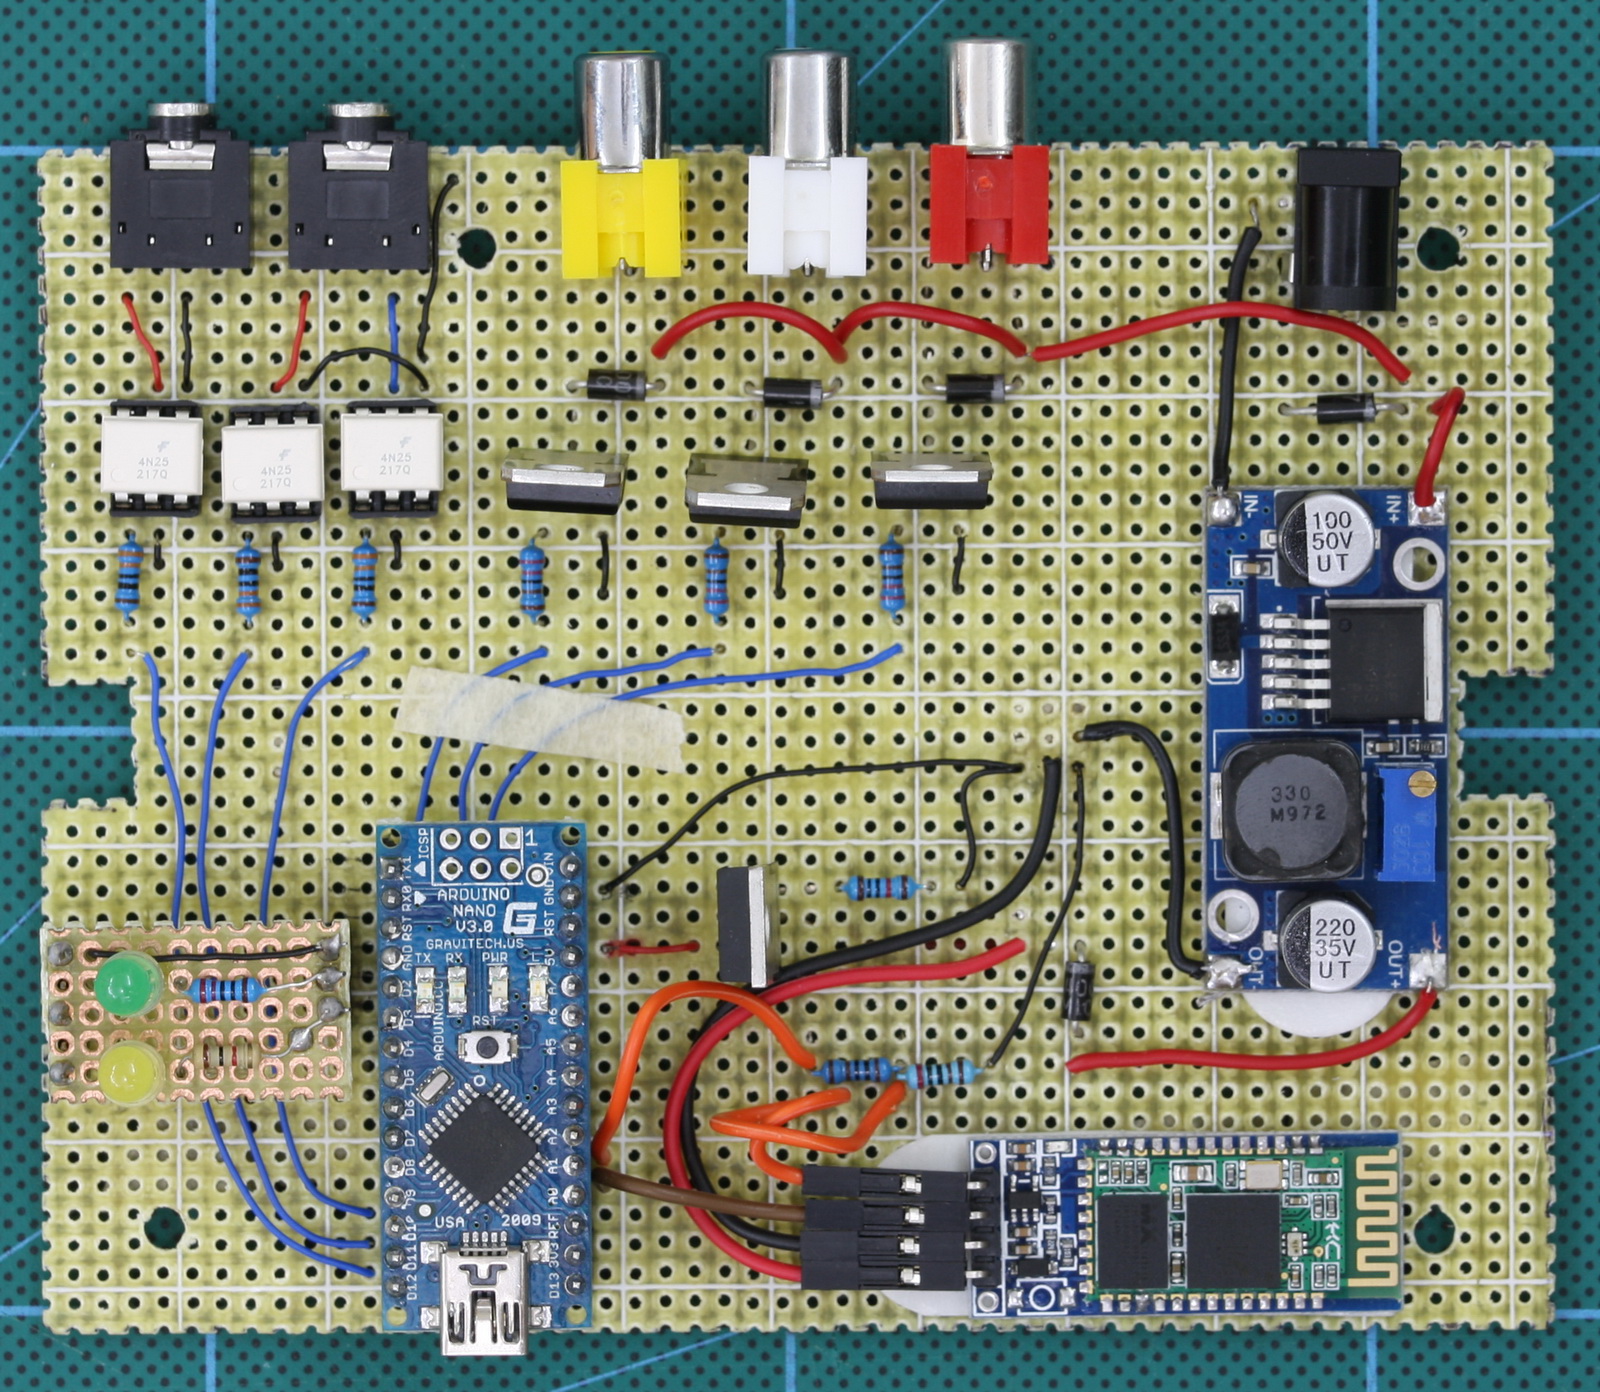
Since the perf board version is intended to go inside a box there no activity LEDs. I also removed the valve drain switches. Draining the valves is done through the app so no physical switches.
I now regret not keeping the valve drain switches and if I build another dropControllerBT I will include them.
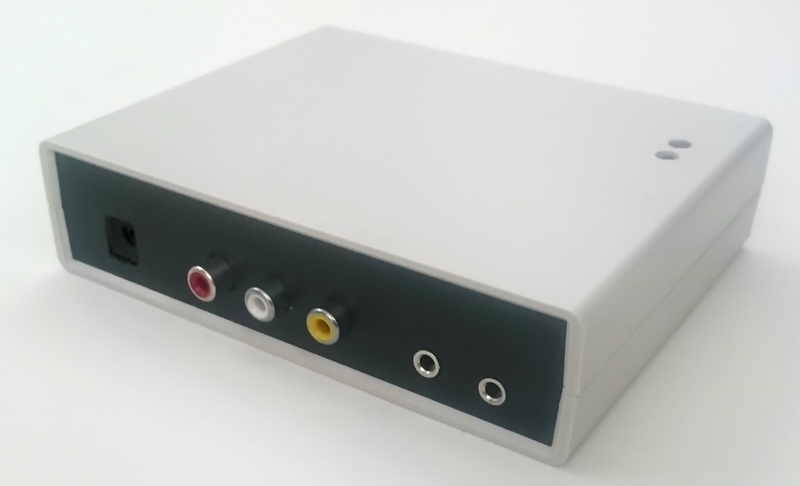
Final Version of a 3 valve dropControllerBT
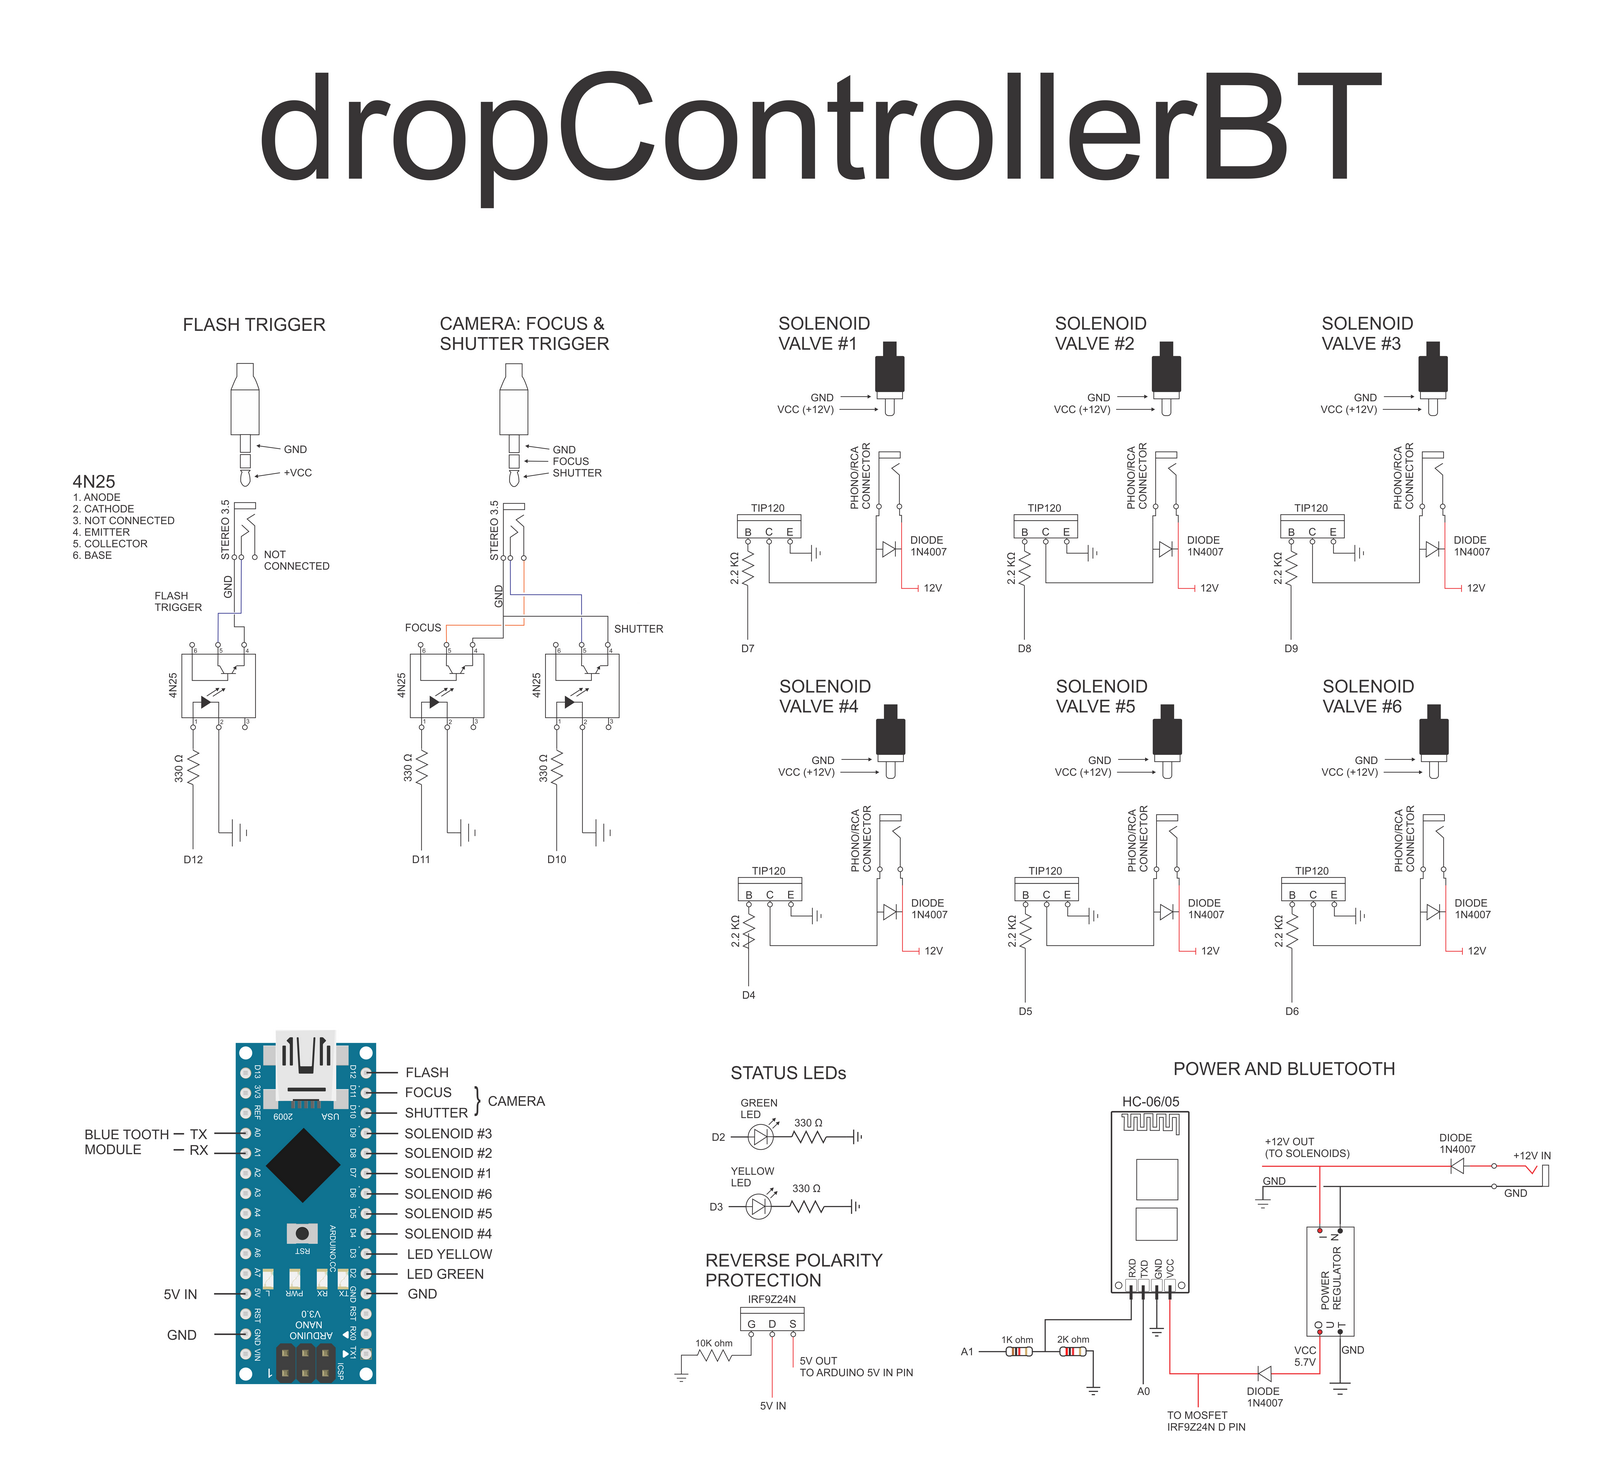
The dropController has been expanded to allow for up to 6 valves. The additional 3 valves connect to pins D4, D5, and D6 the same way as valves 1 to 3. See the circuit diagram for details.
Build Guides
Build guide for the breadboard version.
Build guide for the perf board version.
Please note the build guides are for a 3 valve version. As of 15.05.2016 3 additional valves can now controlled. The additional valves connect to pins D4, D5, and D6.
D4 – valve number 4.
D5 – valve number 5.
D6 – valve number 6.
Here is the full circuit for a 6 valve version.
Preparing the HC-05 or HC-06
The HC-05 or HC-06 Bluetooth module should be set to 9600 baud rate. Most new Bluetooth modules are 9600 but some may not be. If using an HC-05 then it should be used in slave mode.
If you are having problems take a look at www.martyncurrey.com. I have information on setting up and using various kinds of Bluetooth modules there.
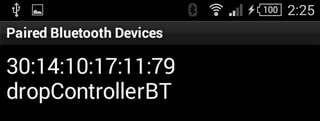
I rename the Bluetooth modules to dropController (or sometimes dropControllerBT) so they are easy to identify when connecting.
Bluetooth Connected LED
If you use a HC-05 that has a STATE pin you can add a blue LED that shows when Bluetooth is connected. The STATE pin goes HIGH when a connection is made so all you need is a blue LED plus a suitable resistor (any colour LED can actually be used). The LED does not connect to the Arduino .
If your module does not have a STATE pin check to see if it has a MCU-INT pin on the small Bluetooth module. This is usually the same as the STATE pin on the breakout board.
Arduino Sketch
I don’t go in to the details on how to install/upload the sketch to the Arduino. This is covered by many many other sites and a Google search will get you started. The dropController sketch is developed in IDE version 1.6.3. If you have problems with later versions revert to 1.6.3.
The sketch uses 6 separate tabs and the main sketch is on the dropControllerBT_PC tab.

Starting with version 009, the same sketch is used for the dropControllerBT and dropControllerPC devices. To set which device you are using, at about line 105, set the device type. The default is set for Bluetooth.

If using USB connected to a computer, set DEVICE_TYPE = 1
If using Bluetooth, set DEVICE_TYPE = 2
I plan to add a hardware switch in a later version.
Android App
The dropControllerBT is controlled via an Android app. This is a lot easier and more convenient that using a keypad and an LCD screen. It also means the Android device does the heavy lifting leaving the Arduino to simply make the drops. The Andriod app does all the calculations for the drop times and the settings and drop data are stored on the Android device not the Arduino. This means the Anrduino sketch used on the BT version is far simpler than the sketch used on the basic version.
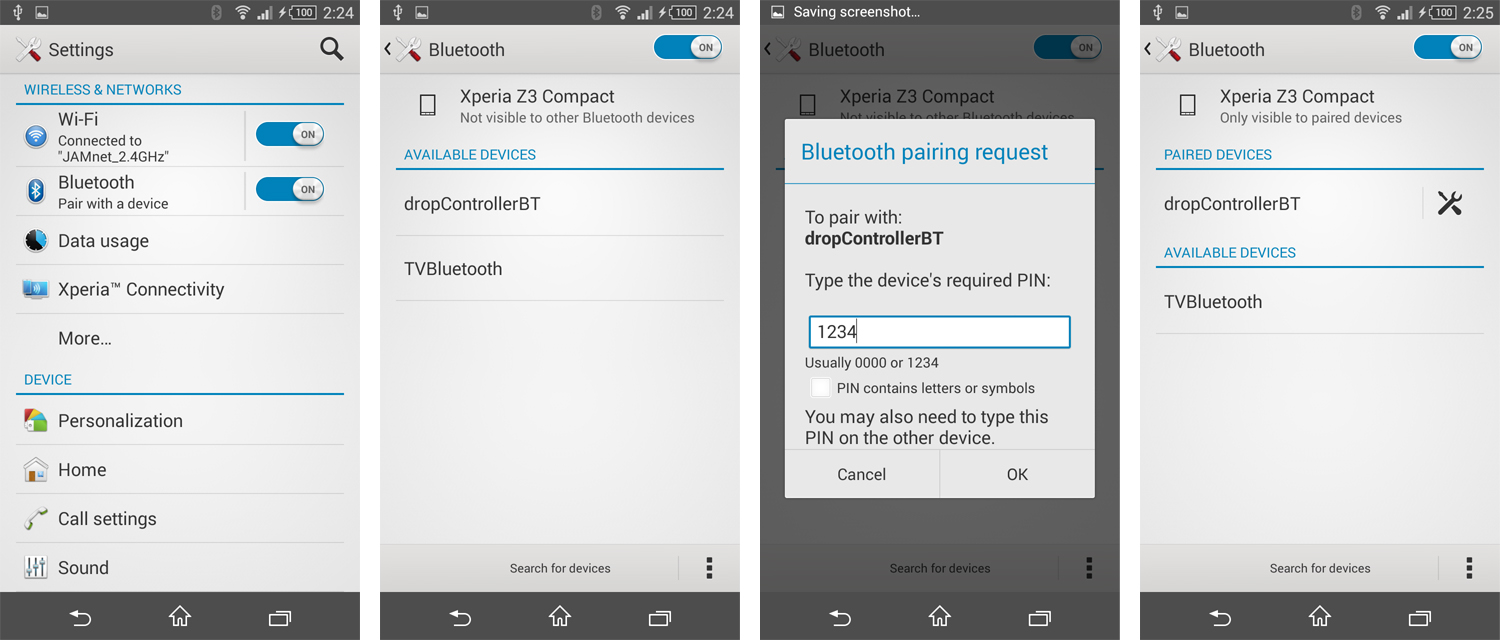
Before you can use the app you need to pair the dropControllerBT with the Android device you are using. The example below is from a Sony Z3 compact.
Pairing the dropControllerBT
Turn on the dropControllerBT, the LED on the HC-06 should flash. The flashing means it is on but not connected.
On the Android device, turn on blue tooth, go to the settings and select Bluetooth. Scan for devices.
Select the blue tooth module used in the dropControllerBT, I have renamed the one I have to dropControllerBT, and enter the pass code. The default code for the HC-06 is 1234.
If the passcode is correct the dropControllerBT will be paired.
Start The App
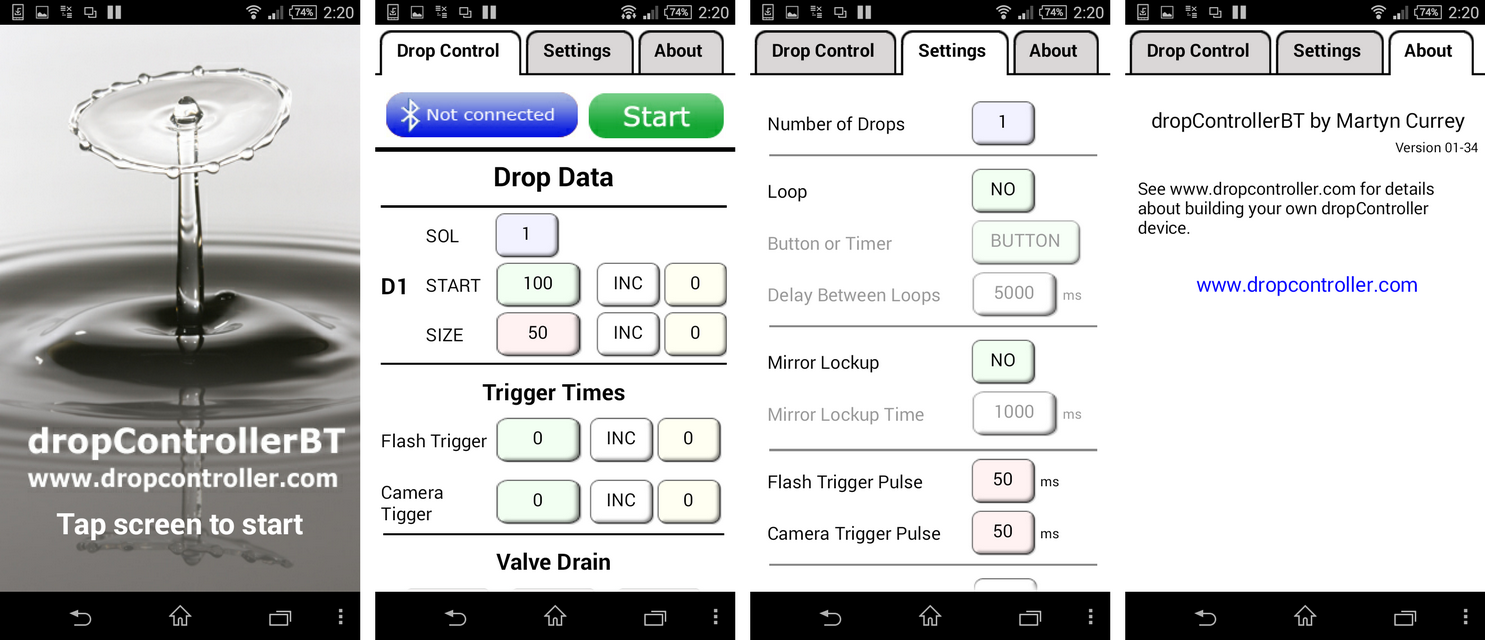
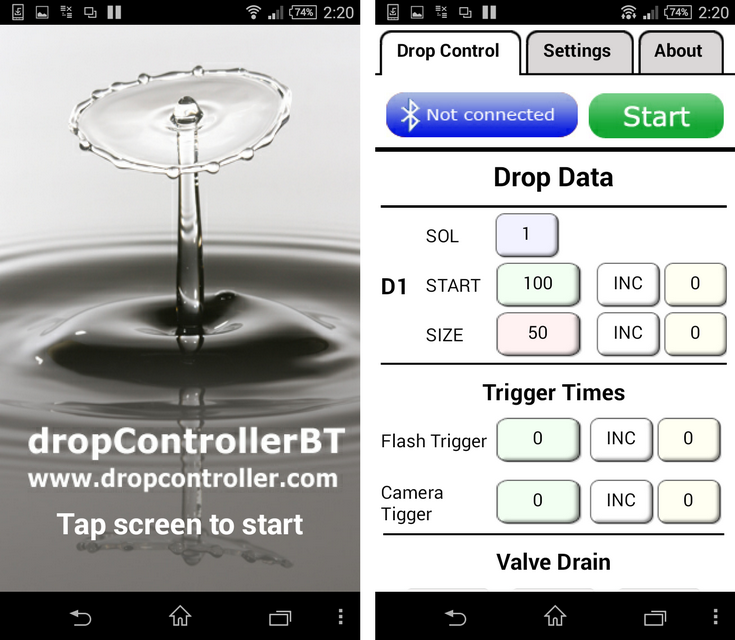
Launch the dropControllerBT app and at the start screen tap anywhere to continue to the main drop data screen.
To connect the app the the dropControllerBT device, click the Bluetooth button, this will bring up a list of the paired devices. Select the dropControllerBT from the list. Remember that the dropControllerBT has to be paired with the Android device before the app can connect to it.
After you have connected to the dropController device the bluetooth button will change to show connected.
![]()
Clicking the Bluetooth button while connected allows you to disconnect.
Drop Data Edit Screen
This is the main screen for entering and changing the drop times.
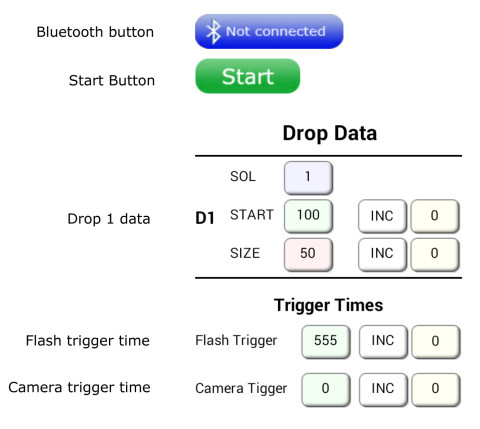
To edit the drop data, click on the relevant drop data button.
The number of drops can be changed on the Settings screen. You can choose from 1 to 9 drops.
- SOL – the the solenoid valve number (1 to 6)
- START – the drop start time in milliseconds (0-9999). This is the time the valve opens.
- START INC – INC or DEC. Increase or decrease the start time every loop.
- START INC time – the amount of time (0-999) to increase or decrease the start time.
- SIZE – the drop size in milliseconds (0-9999). This is the amount of time the valve is open.
- SIZE INC – INC or DEC. Increase or decrease the size every loop.
- SIZE INC time – the amount of time (0-999) to increase or decrease the size.
- Flash Trigger – the flash trigger time in milliseconds (0-9999).
- Flash INC or DEC – increase or decrease the trigger time every loop.
- Flash INC time – the amount to increase or decrease the trigger time.
- Camera Trigger – the camera shutter trigger time in milliseconds (0-9999).
- Camera Trigger INC or DEC – increase or decrease the camera trigger time every loop
- Camera Trigger INC time – the amount to increase or decrease the trigger time.
When the camera shutter time is set to 0 bulb mode is activated. This will open the shutter at the start of the drop sequence and then close it after the flash has fired.
Settings Screen
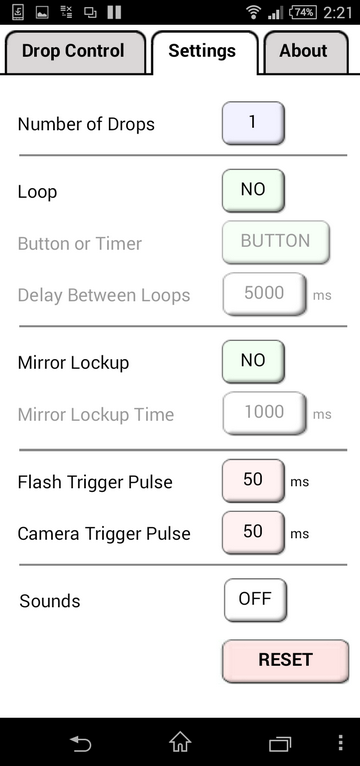
- Number of drops – from 1 to 9
- Number of valves – from 1 to 6 (not shown in the above image)
- Loop YES/NO – when YES is selected, the drop sequence will be repeated.
- Button or Timer – when in loop mode, you can select to wait for a button press or use a timer before the next sequence starts.
- Delay between loops – when using the timer, this is the time in milliseconds to wait before starting the next sequence of drops. There are 1000 milliseconds to a second. This mean 2000 = 2 seconds.
- Mirror lockup ON/OFF- Select YES if you want to use mirror lockup.
- Mirror lockup time – the time to wait after the mirror lockup command.
- Flash trigger pulse – this is the time in milliseconds the flash trigger signal will be active. 50ms is a good default value.
- Camera trigger pulse – the time in milliseconds the camera shutter trigger signal will be active. 50ms is a good default value.
- Sounds ON/OFF – turn annoying sounds on.
- RESET – reset all drop data to default values.
Mirror Lock Up
When mirror lock up is active, a pre-sequence shutter trigger will be issued. Your camera will need to be in mirror lock up mode. The mirror lock up time is the time to wait after the trigger signal. This allows time for the camera to raise the mirror and stop vibrating.
Automatically repeating / looping the drop sequence
When loop mode is active (Loop = YES) the drop sequence will automatically repeat. At the same time any INC or DEC values will be added or subtracted to the corresponding times.
Trouble shooting the Bluetooth Connection
If you are having problems getting the app to talk to the dropController you need to double check that the the Android device is connecting to the Bluetooth module and that the BT module is connected to the Arduino correctly.
When the Android device establishes a connection with the Bluetooth module the LED on the module will change. The change depends on the module you are using but on most HC-06s, for example, the LED will turn on (not flashing).
If you have a connection but still cannot get it to work the problem is likely to be the connections between the BT module and the Arduino or the baud rate. Firstly make sure the BT module is set to work at 9600 baud rate. If you are not sure about how to do this see the guides at www.martyncurrey.com.
There are 2 parts to the connection when using Bluetooth.
1. The Android device connecting to the Bluetooth module, and
2. the app connecting to the dropController/Arduino.
Connection process:
1. The Android device connects to the Bluetooth module. The LED on the BT module changes.
2. The app sends a HELLO message to the drop controller and waits for a reply.
3. The dropController gets the HELLO message and turns on the waiting LED (the yellow one)
4. The dropController sends back the HELLO message.
5. The app gets the reply and changes the BT button and the screen title to connected.
If the waiting LED on the dropController is not turning on then the dropController is not getting the HELLO message. Check the connection between the Arduino RX pin and BT TX pin.
If the LED is coming on but the BT button in the app is not changing then the app is not getting the reply. Check the connection between the Arduino TX pin and the Bluetooth modules RX pin. This is the one with the voltage divider.
Also check that the correct resistors have been used and that they are the right way around.
If you are still having problems have a look at the Bluetooth guides I have on the other website
Arduino and HC-06 (ZS-040)
Arduino With HC-05 Bluetooth Module in Slave Mode
Downloads
Android App
The dropControllerBT app can be downloaded from Google play.
The current app has a slight bug feature. On start up, if the number of valves is set to 1 the SOL list will still activate but the list will be empty. Just hit the back button.
Android App History
Version 1-37
– added 3 more valves
– dropControllerBT device can now be used with a Windows PC with Bluetooth.
– requires sketch version 009 or above.
Version 1-35
– minor bug fixes
– added the About page
Version 1-32
– tidied up the graphics
Version 1-27
– First release
App Inventor aia file
The dropControllerBT app was created is App Inventor 2. You can download version 38 aia file here.
Arduino Sketch
dropControllerBT&PC Arduino Sketch version 009d
Sketch version 009 and above requires the Android app version 1-37 or above. Update through Google play
Arduino Sketch History
Version 009d
– minor bug fix
Version 009c
– minor bug fixes
Version 009
– dropControllerBT and dropControllerPC now use the same sketch
– set the device you are using in the sketch before compiling. Default is dropControllerBT.
Version 006.
– Moved the pins around
Version 005.
– Added valve drain function
Version 004
– Added FOCUS trigger in makeDrops function
– Changed the shutter close time for bulb mode. The shutter now closes 100ms after the flash fires.
Version 003.
– Shortened the acknowledgement code.
Libraries
The Arduino sketch uses the digitalIOPerformance library. This needs to be added to the Arduino IDE before you can compile the dropControllerBT sketch.
Additional Information
HC-06 with Arduino
Arduino with HC-05 bluetooth module
Arduino with HC-05 bluetooth module – AT MODE
Getting Started Photographing Drops
A guide to capturing a Worthing jet here.
An introduction to 2 drop collisions can be found here.